A step by step guide to turning a static illustration into a puppet for Adobe Character Animator. Download a free template with the right hierarchy and properly named layers.
For the character to work well in Adobe Character Animator * the artwork should follow a specific structure and naming convention.
This tutorial explains the layer hierarchy of properly built puppets and demonstrates the workflow of using a template, which you can download in the template section below to quickly turn a static character into a puppet for Adobe Character Animator.
The process of creating a puppet in Adobe Illustrator * is very similar to creating one in Adobe Photoshop *. The main difference would be using layers and sub-layers instead of folders.
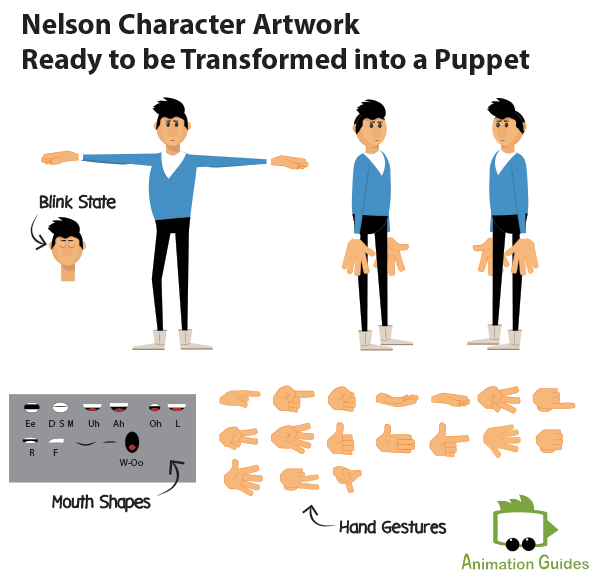
-This tutorial assumes you are familiar with Adobe Illustrator. -We use Nelson character artwork and screenshots to demonstrate the hierarchy of creating a puppet. You candownload the final puppet for free here.
1: Prepare Your Design
The first step would be getting your character ready in terms of all the required elements. You need to create all the artwork that you will later use.
Make sure you have the artwork for:
All the head views you are planning to use.
Front/Profile body views.
Blink state for the eyes.
All hand gestures.
All the mouth shapes (neutral, smile, surprised and phonemes - read on for a full list).
A puppet you will build for Adobe Character Animator can vary in its complexity. A very basic character can only have a front view for the head and the body while a more complex one will have 7 head views, gestures, expressions, and customizable accessories. If you would like your character to be able to walk, you will need to prepare left and right body profiles for it as well.
2: Use a Template
Once you have all the artwork prepared, it is time to stack everything in the right hierarchy and assign correct naming to different elements.
The easiest way is to start with a blank template that contains the required layers and elements.
Download a blank puppet template for Adobe Illustrator.
Open the template in Illustrator.
Open the file with the prepared artwork and copy the assets.
In the template file, create a new layer and paste the copied assets into it.
Now drag each element of the artwork below the corresponding sub-layer.(Read on for detailed hierarchy explanation and examples).
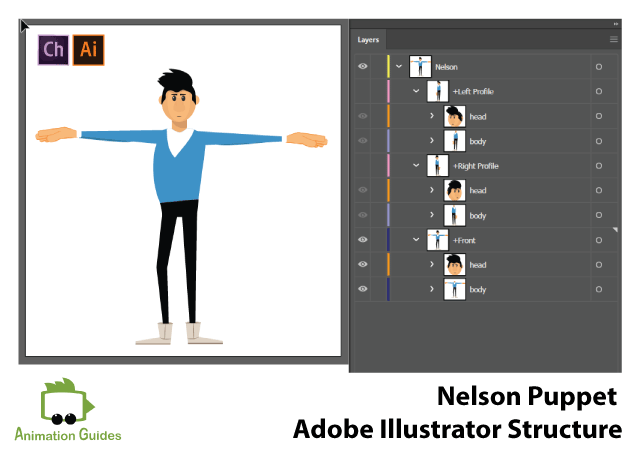
3: Complete Structure Overview
A puppet in Illustrator will have one main layer with the puppet’s name on it and all the body parts will be sub-layers below it.
Basic Character Structure
Puppet Name
Head
Body
Complex Character Structure
Puppet Name
+Left Profile
Head
Body
+Right Profile
Head
Body
+Front
Head
Body
Each of the sub-layers head and body should also follow a specific structure. You can decide on how complex your structure should be based on the required functionality.
Does your character need to walk? Will it stand still? Will it turn its head? What gestures do you want it to perform?
Naming Convention
It is important to follow Adobe guidelines when it comes to naming your sublayers. Once named properly Character Animator would be able to recognize the specific body part as such and rig it for you.
4: Head
The number of head views you create will determine if your puppet be able to turn its head and how smooth will the movement be. It is possible to only have a front head view and you can have all 7 of them: front, 3/4 left, left, 3/4 right, right, top, bottom. Anything in between is acceptable as well.
Basic Head Structure
Head
+Frontal
Complex Head Structure
Head
+Frontal
+Left Quarter
+Left Profile
+Right Quarter
+Right Profile
+Downward
+Upward
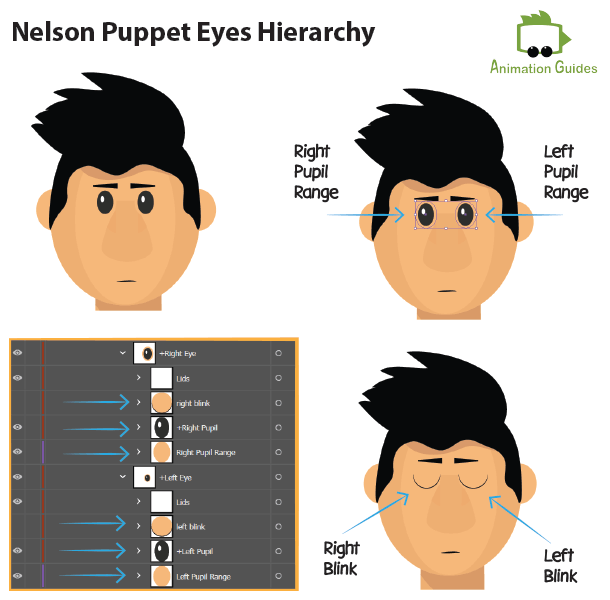
Nelson Puppet, for example, was created with just 3 head views: Frontal, Right Profile, and Left Profile.
4a: Head View
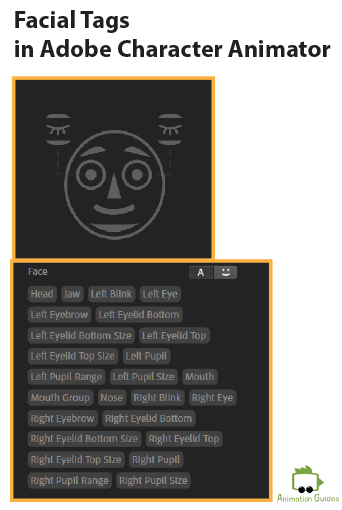
Each of the head views you decide to create needs to have different facial parts stacked on properly named sub-layers below it.
You don’t have to include all possible facial parts in your design, the software recognizes the parts with the right naming and ignores the ones that are ‘missing’. The more facial elements you include the more expressive your puppet will feel.
Facial parts Character Animator recognizes are:
+Mouth
+Nose
+Right Eyebrow
+Left Eyebrow
+Right Eye
Right Pupil
Right Eyeball
Right Blink
Right Eyelid Top
Right Eyelid Bottom
Left Eye
Left Pupil
Left Eyeball
Left Blink
Left Eyelid Top
Left Eyelid Bottom
In Adobe Character Animator you can assign a tag manually to each of the facial parts, but the software will do that automatically if you name them properly in your design software. That can be a major time saver.
4b: Mouth
The software is able to automatically lip-sync your character according to your voice or external audio. For it to work properly the character must come with premade and correctly named mouth shapes-phonemes.
You should also include mouth shapes for the smile, surprise and neutral position as those are recognized by the camera.
Each mouth shape should be on its own sub-layer and all of them must be placed below another sub-layer called +Mouth.
Basic Mouth Structure:
+Mouth
Neutral
Smile
Surprised
Aa
Oh
Uh
Ee
D
F
L
M
R
S
W-oo
Complex Mouth Structure:
Mouths
+Mouth
Neutral
Smile
Surprised
Aa
Oh
Uh
Ee
D
F
L
M
R
S
W-oo
+Sad Mouth
All the sub-layers with mouth shapes
+Happy Mouth
All the sub-layers with mouth shapes
+Angry Mouth
All the sub-layers with mouth shapes
In many cases, it is not enough just to have one mouth set.
If we are sad, happy or angry that is often reflected in the way we talk. We might want our character to express different emotions while talking. For that we will need to create several mouth groups with all the mouth shaped below them (+Angry Mouth, +Sad Mouth, etc.).
4c: Eyes
The eyes of the character should also be built in a proper hierarchy.
Eye Structure:
+Right Eye
+Right Pupil
Right Eyeball
Right Blink
Right Eyelid Top
Right Eyelid Bottom
The eyeball of the character should be labeled as right/left pupil range. It is still important to create such a layer even for characters (such as Nelson above) who don’t have an obvious eyeball in their design. The pupil of your puppet will follow your pupil movements as recognized by your video camera and therefore it is important to limit them into a specific area.
4d: Duplicating the Head for Left and Right Profile
You should follow the same steps to create all the head views (frontal, left quarter, left profile, right quarter, etc.) you need. Once you are happy with the result it is time to duplicate the head with all of its views to the left and right profiles.
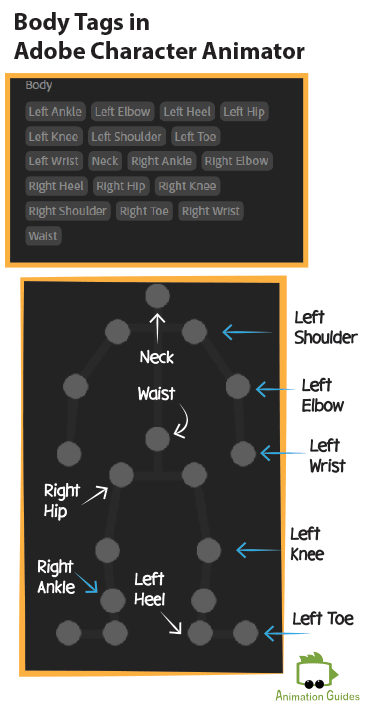
5: Body
Unlike with facial elements, in most cases, we will need to create the body rig for our characters manually and there is no need to include all the recognizable body tags in our design.
Body parts Character Animator recognizes are:
Waist
Neck
Right Shoulder
Right Elbow
Right Wrist
Left Shoulder
Left Elbow
Left Wrist
Left Hip
Left Knee
Left Ankle
Left Heel
Left Toe
Right Hip
Right Knee
Right Ankle
Right Heel
Right Toe
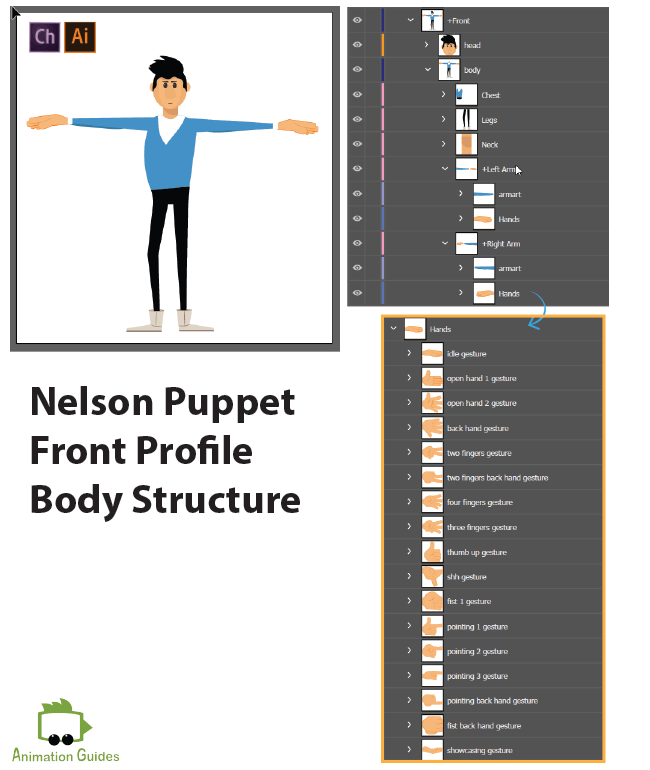
5a: +Front
The important part is to make the arms separated and independent (+Left Arm, +Right Arm).
If we want the character to have different hand gestures we will create each hand gesture on a different sub-layer and place them all as part of the arms.
Body structure Front:
Body
+Left Arm
ArmArt
Hands
Hand Gesture 1
Hand Gesture 2
Hand Gesture 3
Hand Gesture 2
+Right Arm
ArmArt
Hands
Hand Gesture 1
Hand Gesture 2
Hand Gesture 3
Hand Gesture 2
top body
neck
+Right Leg
+Left Leg
In some cases, you will want the puppet to move the arms in front and behind the face. That will require building a more complex structure. You can read all about it here.
5b: +Right Profile/ Left Profile
Body structure Front:
Body
+Right Arm
ArmArt
Hands
Hand Gesture 1
Hand Gesture 2
Hand Gesture 3
Hand Gesture 2
+Right Leg
top body
+Left Leg
+Left Arm
ArmArt
Hands
Hand Gesture 1
Hand Gesture 2
Hand Gesture 3
Hand Gesture 2
neck
Congratulations!
Once the character design in Adobe Illustrators follows a proper hierarchy and naming conventions it can be imported into Adobe Character Animator.
Now What?
Now it is time to import your character into Adobe Character Animator. You will see that the puppet will already react to your facial movement and audio. With some simple rigging, it will be able to move its hands, perform gestures, walk and more. We will have the rigging process covered in the next tutorial. Stay tuned!
Hey!
I'm a CG artist, designer and illustrator. I love to explore different creative forms, media types and artistic styles. Feel free to write me with your ideas, suggestions or requests.
Thanks Katia for sharing. I am just wonder if there is any market (perhaps on fiverr.com?) where I can find Adobe illustrator artist who can draw us all required artwork tailor to our needs, some of them just a modification or addition after the character’s artwork was developed. such as let’s say, if we require Nelson is drinking at a party scene on our story, we simply need an extra hand position & gesture artworks of Nelson that hold a glass so we could rig it up in Adobe CH. Can you recommend some one who are offer this services?
Asihan Hi,
We offer custom puppet creation and illustration services as well. Please contact us using this contact form and send us more details about your requirements.
Chris
5 years ago
This is AWESOME. I haven’t found a tutorial so thorough yet. Thank you so much Katia1:)
You’re welcome! Great to hear that you’ve liked them.
Fercho
6 years ago
Good morning I would like to tell you that I am working on a project of regional languages of Guatemala and I would like to know if I can create drawings with forms of typical Guatemalan costumes with the movements and gestures that indicate what is being talked about.
It is definitely possible to create a puppet with different Goutemalian costumes and animate it in Character Animator.
It will require creating illustrations for the different outfits in Illustrator and then creating a swap set in Character Animator to trigger each of them separately.
When it comes to puppets structure in Adobe Illustrator it is mostly a standard structure. Each outfit will most likely have its own artwork for the: top body, arms, and legs. You need to put the different illustrations for each element below its main layer ( like all the hand gestures are below Hands Layer in the example).
As for the gestures those can be animated in the Character Animator. The animation process in Character Animator is relatively simple and does not require special animation skills. Once the character is rigged it is basically dragging the handles for the hands and legs in runtime. Once animated those can be saved as replays and performed whenever you need them during the recording.
What the * means above
Please note, that the links that have * next to them are affiliate links and those help support AnimationGuides.com website. If you decide to purchase something through those links, we will get a small commission that will help us to continue and provide new free content on this website.
For you, going through those links is the same as clicking on a direct link. You will never pay more for products as a result of clicking on our links. If anything, that can actually help you get a better price since we can sometimes negotiate better deals for our readers.
The content on our website is not affected by the affiliate products and always reflects our honest opinion. All the reviews you will find on AnimationGuides.com are unbiased reviews. If a product we recommend does not have a supporting affiliate program, we will still link to it, just with a standard link without the *.


good job and good tuturial . i want just say the perfect toturial
Thank You Ridha
Thanks Katia for sharing. I am just wonder if there is any market (perhaps on fiverr.com?) where I can find Adobe illustrator artist who can draw us all required artwork tailor to our needs, some of them just a modification or addition after the character’s artwork was developed. such as let’s say, if we require Nelson is drinking at a party scene on our story, we simply need an extra hand position & gesture artworks of Nelson that hold a glass so we could rig it up in Adobe CH. Can you recommend some one who are offer this services?
Thanks
Asihan Hi,
We offer custom puppet creation and illustration services as well. Please contact us using this contact form and send us more details about your requirements.
This is AWESOME. I haven’t found a tutorial so thorough yet. Thank you so much Katia1:)
Thank you Chris. I am happy you found it helpful 🙂
Wow. Great tips Katia. Thanks.
Hey, Erik!
You’re welcome! Great to hear that you’ve liked them.
Good morning I would like to tell you that I am working on a project of regional languages of Guatemala and I would like to know if I can create drawings with forms of typical Guatemalan costumes with the movements and gestures that indicate what is being talked about.
Fercho Hi,
Your project sounds very interesting.
It is definitely possible to create a puppet with different Goutemalian costumes and animate it in Character Animator.
It will require creating illustrations for the different outfits in Illustrator and then creating a swap set in Character Animator to trigger each of them separately.
When it comes to puppets structure in Adobe Illustrator it is mostly a standard structure. Each outfit will most likely have its own artwork for the: top body, arms, and legs. You need to put the different illustrations for each element below its main layer ( like all the hand gestures are below Hands Layer in the example).
As for the gestures those can be animated in the Character Animator. The animation process in Character Animator is relatively simple and does not require special animation skills. Once the character is rigged it is basically dragging the handles for the hands and legs in runtime. Once animated those can be saved as replays and performed whenever you need them during the recording.