Generate Blank Puppet Template in Illustrator [Free Script]
Download a free script to generate blank puppet templates for Adobe Character Animator in Adobe Illustrator. [Right structure and layer names in one click]
For a character illustration to be used as a puppet in adobe character animator, it should follow a very specific structure, hierarchy, and naming conventions. All of those are described in detail in our guide to creating a puppet in Adobe Illustrator *.
The easiest way to assign proper hierarchy and names to an existing illustration is by using a blank puppet template.
By using a script available for free download in this post you can generate a blank puppet template in any illustrator document.
Static Template vs. a Template Generated with a Script
There is nothing wrong with using a standard blank puppet template file and placing your character art upon it. However, using a script might be a more convenient option.
You don't need to create a new document. Blank puppet hierarchy can be generated in any .ai document. (You will only need to delete unrelated layers that already exist in the document).
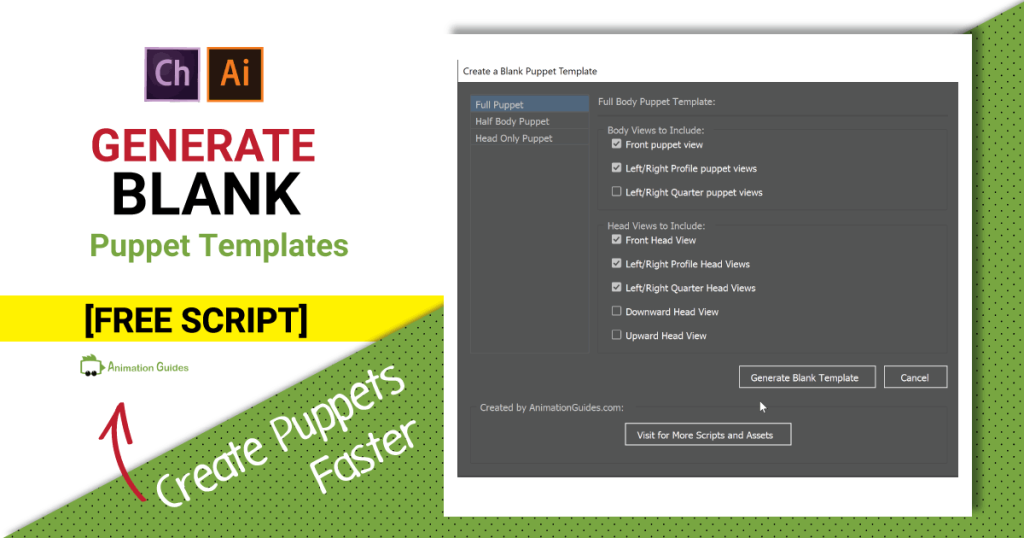
You can select the exact puppet views and head views to generate for the puppet. (Layers for the views you are not planning to use will not be generated).
You can generate a template based on your requirements: Full Puppet Template, Half Body Puppet Template or just Head Template.
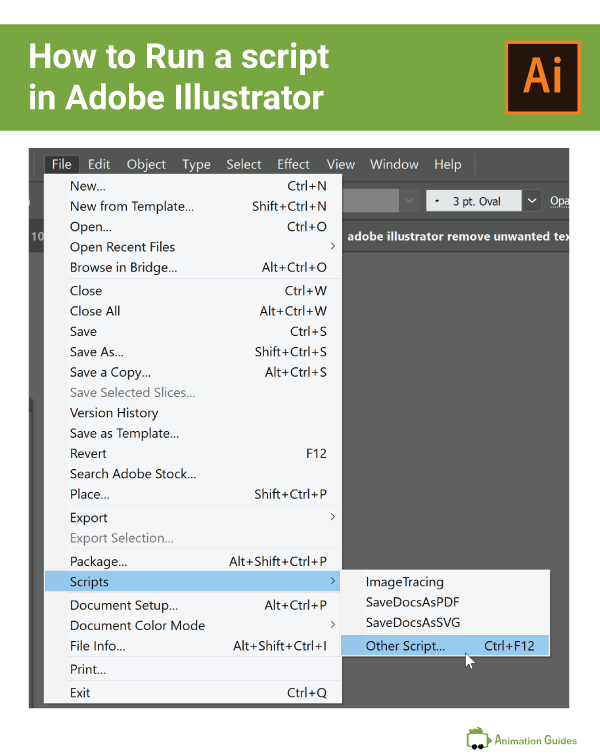
Running a script in Adobe Illustrator is a matter of a few mouse clicks. Go to File –> Select Scripts –> Other Scripts . Then navigate to where you saved the downloaded javascript file.
You can also save the download .jsx file in the Presets –> Scripts folder for Adobe Illustrator. that will allow you to easily run this specific script directly from the scripts menu.
How to Use the Script?
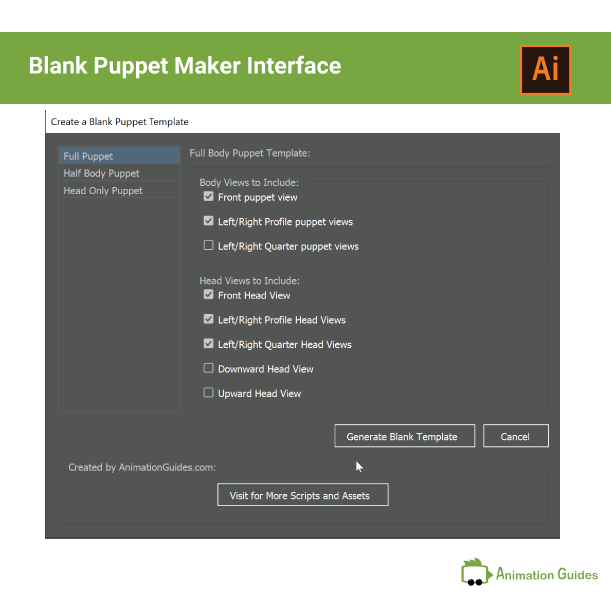
Once you run the Blank Puppet Maker Script the following UI panel will appear:
Here you can select the type of template you would like to create and the views that should be included in it:
What will be Generated?
A new layer named “Puppet” will be created and it will include all the puppet layers that were selected in the section “Body views to include”:
The head sublayer will include all the selected head views. Each head view will have a sublayer for accessories, hair, eyebrows, ears, nose, and eyes.
The mouth layer will have different mouth layers for different moods: happy mouth, sad mouth, angry mouth, and regular mouth. Each of those will have sublayers for lip sync. If you plan to use just the regular mouth group you can delete all the other ones.
Hey!
I'm a CG artist, designer and illustrator. I love to explore different creative forms, media types and artistic styles. Feel free to write me with your ideas, suggestions or requests.
Please note, that the links that have * next to them are affiliate links and those help support AnimationGuides.com website. If you decide to purchase something through those links, we will get a small commission that will help us to continue and provide new free content on this website.
For you, going through those links is the same as clicking on a direct link. You will never pay more for products as a result of clicking on our links. If anything, that can actually help you get a better price since we can sometimes negotiate better deals for our readers.
The content on our website is not affected by the affiliate products and always reflects our honest opinion. All the reviews you will find on AnimationGuides.com are unbiased reviews. If a product we recommend does not have a supporting affiliate program, we will still link to it, just with a standard link without the *.