Eyes are considered to be a window to our soul. Different studies have shown that those are the eyes that help us interpret other people’s feelings.
What is This Post About?
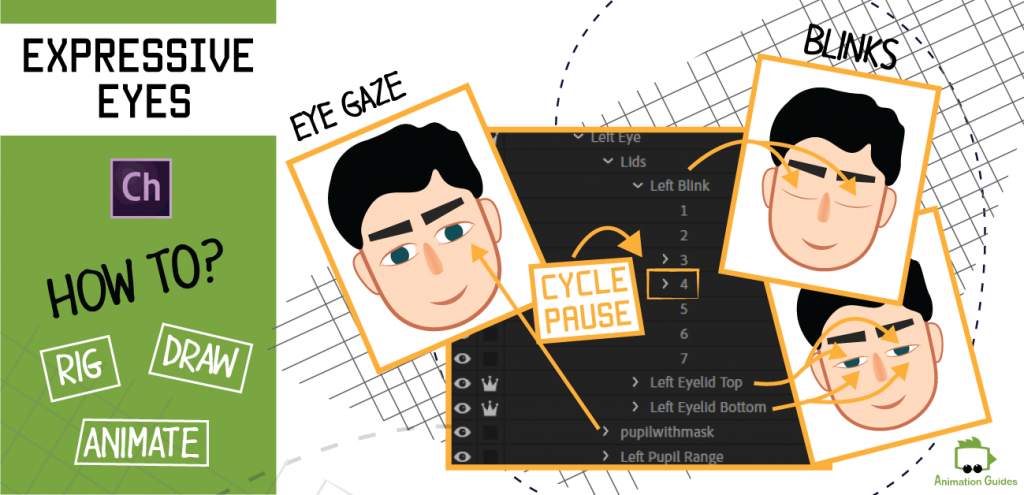
In this post, we will talk about the right hierarchy for simple and more advanced eye rigs in Character Animator. Different methods to make your puppet blink and why it is important. Everything about eyelids, pupil controls, masks, pupil size changes, and more.
Layer Structure
Each eye (Left and Right) should be on its own independent layer (group) and all of the eye-related elements (blinks, eyelids, pupils, eyeballs, etc.) should be included as sublayers below it.
The complete layer structure for eyes is:
Right Eye Structure
- + Right Eye
- Lids
- Right Blink
- +Right Eyelid Top
- +Right Eyelid Bottom
- Pupil with Mask
- +Right Pupil
- Mask
- Right Pupil Range
Left Eye Structure
- + Left Eye
- Lids
- Left Blink
- +Left Eyelid Top
- +Left Eyelid Bottom
- Pupil with Mask
- +Left Pupil
- Mask
- Left Pupil Range
Most of the parameters in the eye structure are optional. You can choose to not include some of them. Just leave the layer of the missing elements empty or remove it completely.
Blinks
There are three types of blinks: a spontaneous blink, that happens mostly to keep our eyes moist. A reflex blink occurs as a reaction to an external stimulus, such as loud noise or a strong light source. And the third type of blink is a voluntarily blink.
People blink about 10 times per minute. But we blink less if our eyes are focused on something (reading is an example of this). We blink more in times of excessive thinking, nervousness, and anxiety.
When animating *, it is best practice to add a blink every time our character changes eye direction or turns his/her head.
A change in thoughts and emotions almost always occurs with a blink.
This concept explained extremely well in this book about film editing. The writer treats eye blinking as an emotional cue for switching between scenes. Just like a camera cut.
Adobe Character Animator lets us approach blinking in different ways:
Single Layer Blink
We can indicate a blink by having just a single illustration of the closed eyes.

Example Eye Structure
- + Right Eye
- Lids
- Right Blink
- 1
- +Right Pupil
- Right Pupil Range
Suitable for certain cartoon styles.
Cycled Layers Blink
We can draw an animated cycle of a closing eye and that animation will occur each time our puppet blinks.

Example Eye Structure
- + Right Eye
- Lids
- Right Blink
- 1
- 2
- 3
- 4
- +Right Pupil
- Right Pupil Range
Smoother result.
Lids Instead of Blinks
It is possible to just use the eyelids with a relatively high value of ”Eye Lid Strength” to create blinks.

Example Eye Structure
- + Right Eye
- Lids
- +Right Eyelid Top
- +Right Eyelid Bottom
- +Right Pupil
- Right Pupil Range
To get a full blink with this technique, you will need to set the eyelid strength to a relatively high value and that will often make the eyelids movement too sensitive.
Blinks in Character Animator are set up in such a way that when a blink is turned on it hides everything in a group below it. This is why it is best to put the blink in a separate group together with the eyelids.
The method you chose for the blinks depends on the style of your puppet and your personal preferences.
Incorporating eyelids for the squints together with animated blinks results in the most expressive and believable result.
Step by step guide for creating "Cycled Layers" blinks in Adobe Character Animator.
- Draw all the frames for the blink.
In general, the more frames you add between closed and open eye states, the smoother the blink will be. You can set the frame rate later on in Character Animator. Too many frames can however result in a blink that is too slow.
A standard blink has about 7 frames:

It is a common practice, when creating a puppet for Character Animator, to only draw the closing eye frames for the blink animation and then use the “Reverse Frames” option in the software for the opening of the eyes.
If taking this approach, you will only need the first part of the blink animation cycle.
Half blink for Adobe Character Animator:
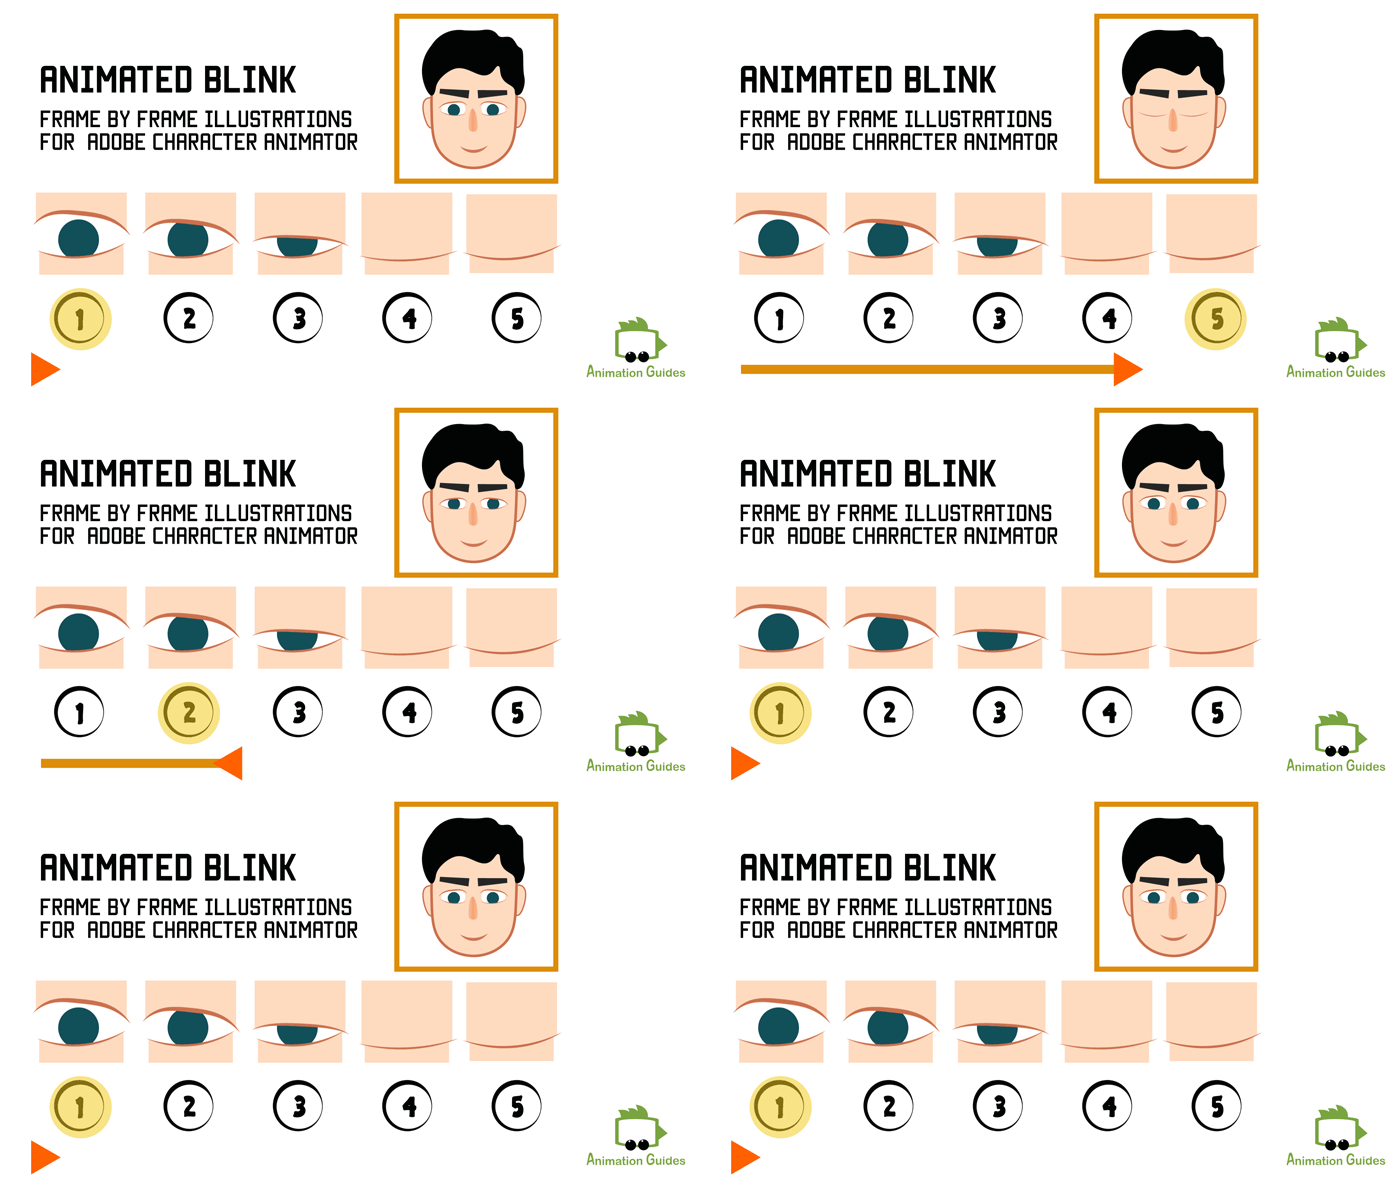
Although in many cases this method will be good enough, reversible blink may sometimes look too artificial and not work in certain situations. In many cases, especially those where our character has long eyelashes it might be important to have different animations for the opening and the closing of the eyes.
The eyelashes will point up when the eye is closing and point down when the eye is opening.

The number of frames for the opening and the closing is usually different as well.
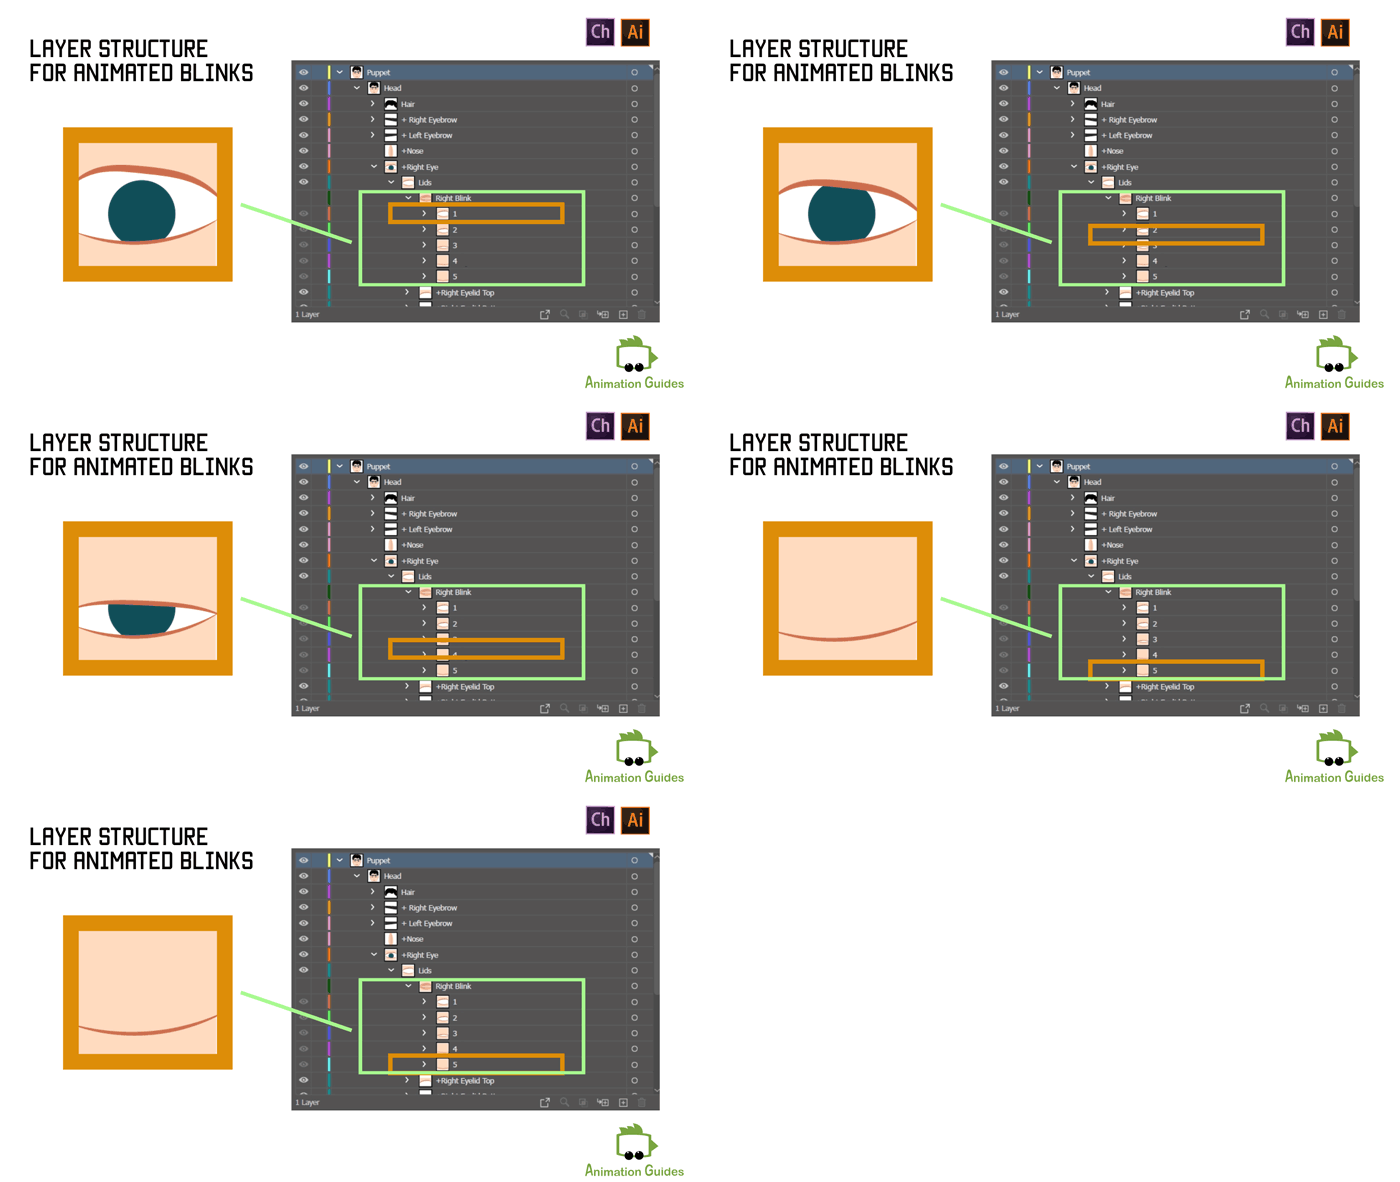
- Place each blink state in a numbered layer below the Left Blink and Right Blink layers.
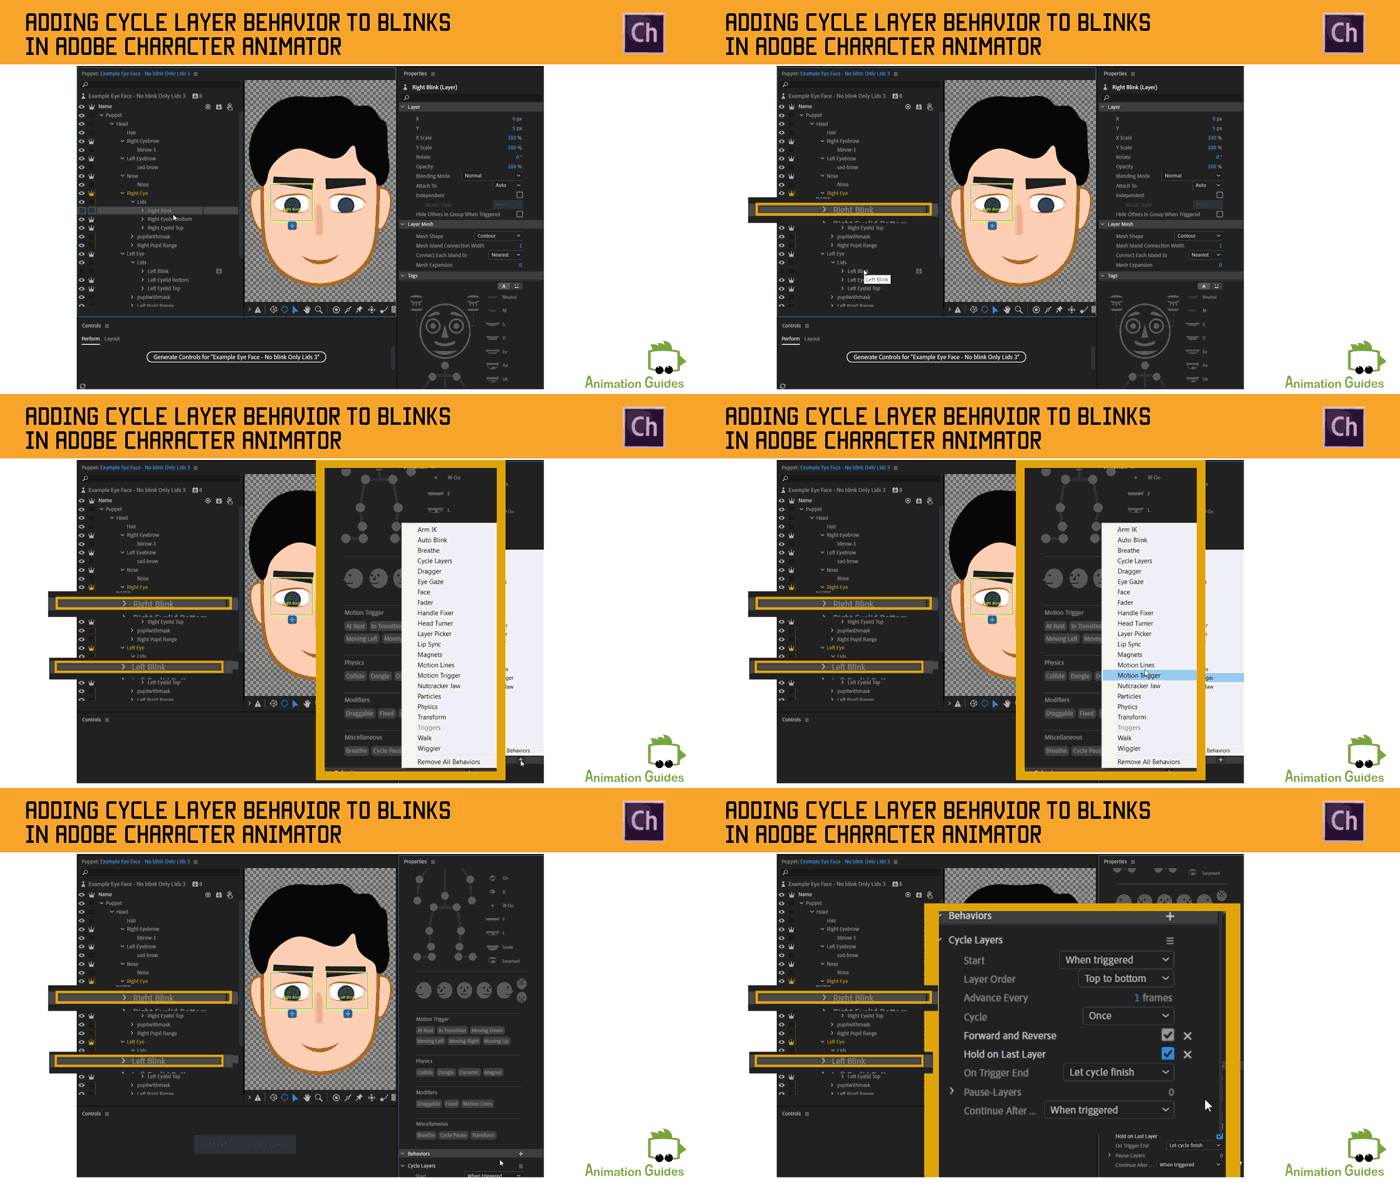
- In Character Animator select both Left and Right Blink layers and add cycled layer behavior to them.
Cycled layer blinks in Character Animator are usually set up in such a way, that the same animation is played for the closing and the opening of the eye. If that is the approach you are taking make sure to turn on the “Forward and Reverse” option on cycle layer behavior.
Half Blink Settings:

Full Blink Settings:

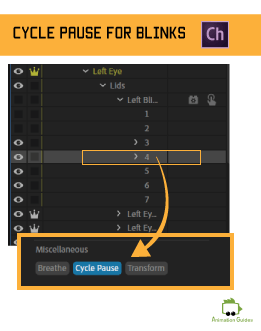
For a full cycle to work properly in Adobe Character Animator, you need to tag a fully closed eye layer as “Cycle Pause”.
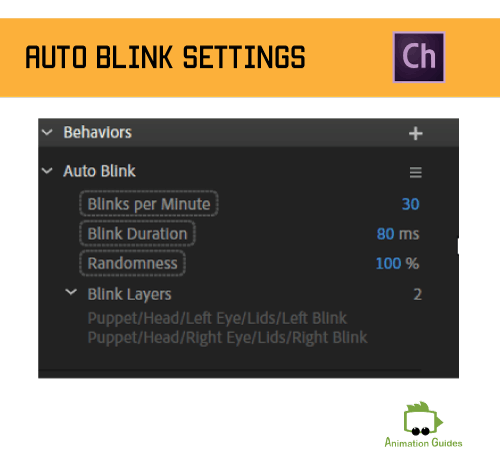
Character Animator lets you schedule the blinks to automatically occur X amount of time per minute. You can set the amount of time each automatic blink will last and there is also an option to randomize this automatic behavior.
To activate automatic blinks in Character Animator, just add the “Auto Blink” behavior to your top-level puppet.
Eyelids
Eyelids are one more facial element that can help emphasize the emotion we are trying to convey.
Big opening of the eyelids and revealing more of the white eye area helps convey surprise, shock, fear, or craziness. Narrowing the eyes may help people with eyesight problems to see better, but it also may be a sign of stress, anxiety, anger, suspicion, and discomfort.
If named correctly, the Character Animator will automatically recognize the artwork for top and bottom eyelids.
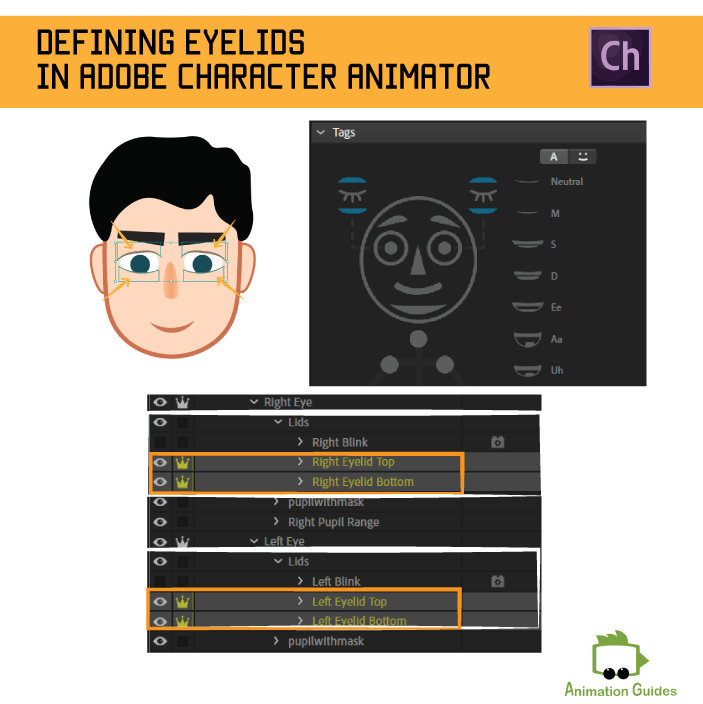
You can control the sensitivity of the eyelids by playing with the “Eyelid Strength” parameter.
Pupils
Realistic pupil movement contributes a lot to the believability of the animation. In Adobe Character Animator pupil movement can be controlled by keyboard input, mouse movement, or camera input.
When set to camera input the pupils will move according to your own pupil movements. If you are good at acting, that may be the easiest option to achieve realistic results. You can also copy tracking data from external video. You can read about how to do that here.

Keyboard control may be good for making the character quickly look left, right, up, and down. You can also create diagonal darts by combing left/right and up/down arrow keys.
Mouse control allows moving the pupils to any desired direction.
It is a common practice to switch between different methods between the recordings. Better results are usually achieved if separating the recordings of one of the red dots at puppet behavior to unarm everything and then mouse click on the eye gaze to arm it on its own.

The sensitivity of each of the eye gaze control methods can be adjusted by playing with the values of camera strength, mouse and touch strength, and keyboard strength.
You can also make the pupil snap by turning on the “Snap eye gaze” option and setting the wanted snap duration. Using this option will prevent the puppet from having floating eyes that may look very unrealistic in certain situations. This option will constrain the pupil to move in one of the 8 directions: right, left, up, down, up-right, up-left, down-right, down-left.
“Smoothing” is another eye gaze related control parameter, which affects the number of in-between frames between every pupil movement.
Masks
For the pupil to stay in the eyeball area you need to have a sublayer name “Left/Right pupil range”. The artwork on that layer should define the limits of pupil movement.
However, those limits will apply to the center point of the pupil. In many cases, especially if the pupils of your puppet are large and the eyes don’t have eyelids, parts of the pupil may still come out of the eyeball area. This can be easily avoided by using masks for the pupils.

Extras
Along with different functionalities that the software provides for pupil movements, you might want to incorporate more options to pupil controls. One of those is a change in pupil size.
Pupil Size
In real life pupil size changes in low/bright light situations, when looking at close/faraway objects. Change in levels of concentration, as well as touch, pain, and emotional state may cause the pupil to dilate or become smaller.
In Character Animator we can make the pupils of our puppets change in size during the recordings in several ways. We can use cycle layer animations, have different pupil graphics to switch between in a swap set. A more versatile approach would be to add a transform parameter to each of the pupils and control the scale of the pupils using keywords, triggers, and sliders.
1. Add "Transform" behavior to both left and right pupils.
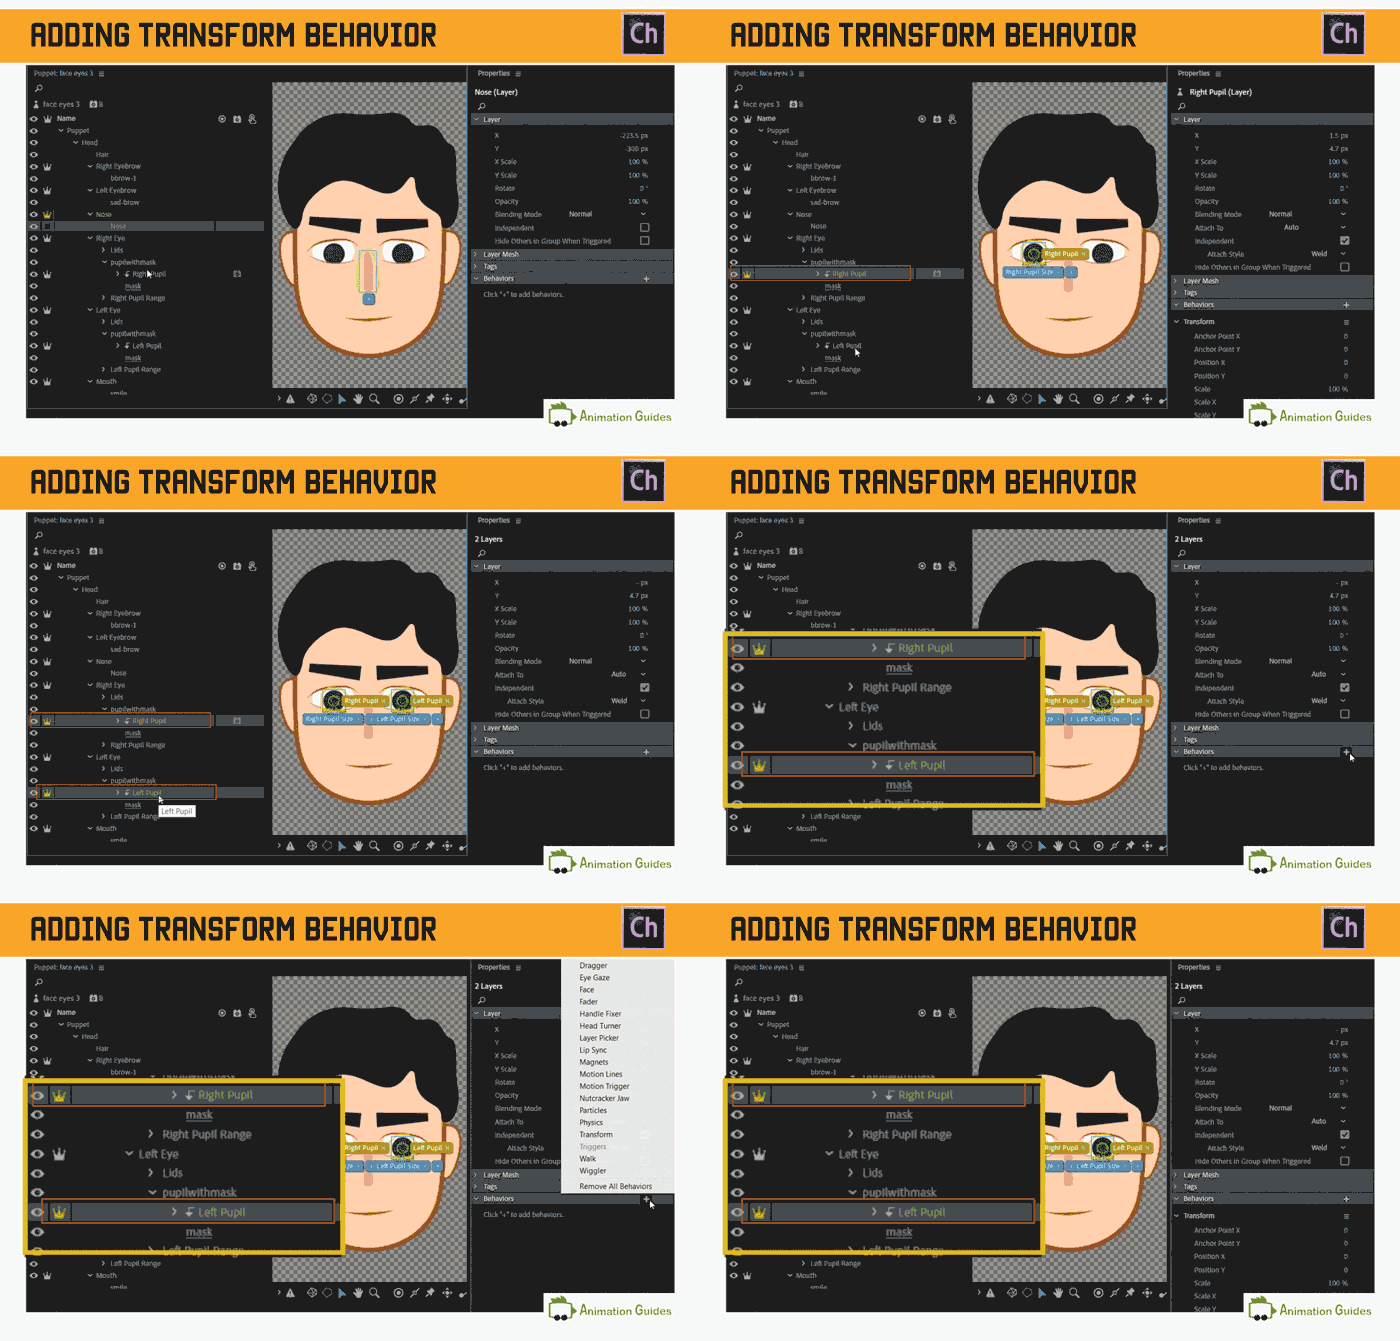
2. Add scale parameter from the transform behavior of both pupils to the control panel.
3. Turn on the keyframe animation stopwatch for the scale parameter.

4. Define the lower and upper limits for the added sliders.
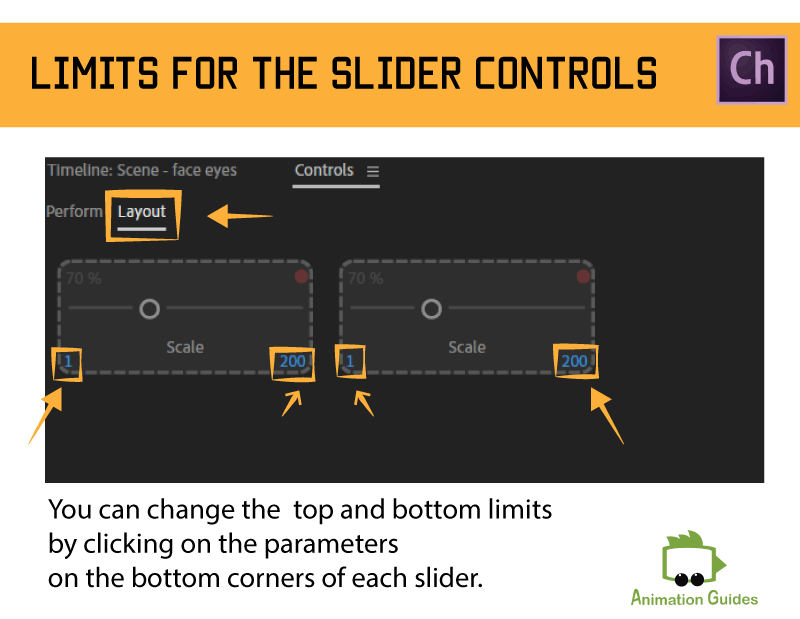
You can change the slider limits by clicking on the values on the bottom corners of each slider control. Make sure you are in the "Layout Mode".
5. Select both sliders and group them together.
6. You can now switch to the "Perform Mode" and record animations for pupil dilation, pupils that turn smaller, and more.
Result:
You can now switch to the “Perform Mode” and record animations for pupil dilation, pupils that turn smaller just by dragging the slider.
6. Record animations for changes in pupil size: from normal to big, from big back to normal, from normal to small, from small back to normal.
7. Create a swap set in a triggers panel, name it "Pupils Size Change".
8. Add the recorded animation as triggers to this swap set, set everything to latch.
9. Add the triggers to the control panel.
For a cartoony effect, you can also add additional graphics to pupil art: dollar signs, hearts, etc. Create a swap set that allows switching between them. The size sliders will apply to each of them as well.
Now What?
Once your puppet has a good eye rig it is time to work on an expressive mouth and eyebrows as those also have a major role in conveying your character’s emotion.
Stay tuned for new tutorials.
Shop Related Products:
- Facebook4
- Twitter2
- Pinterest74
- Email6
- Subscribe
- 86shares
- Like
- Digg
- Del
- Tumblr
- VKontakte
- Buffer
- Love This
- Odnoklassniki
- Meneame
- Blogger
- Amazon
- Yahoo Mail
- Gmail
- AOL
- Newsvine
- HackerNews
- Evernote
- MySpace
- Mail.ru
- Viadeo
- Line
- Comments
- Yummly
- SMS
- Viber
- Telegram
- Subscribe
- Skype
- Facebook Messenger
- Kakao
- LiveJournal
- Yammer
- Edgar
- Fintel
- Mix
- Instapaper
- Copy Link


![Ian Businessman Puppet for Adobe Character Animator [Advanced] Ian advanced businessman puppet for adobe character animator](https://www.animationguides.com/wp-content/uploads/edd/2022/05/Ian-advanced-businessman-puppet-for-adobe-character-animator-250x250.png)
![Ken - Businessman Puppet for Adobe Character Animator [Advanced] ken male puppet adobe character animator businessman advanced](https://www.animationguides.com/wp-content/uploads/edd/2022/10/ken-male-puppet-adobe-character-animator-businessman-advanced-250x250.png)

