How to Make Arms Go in Front of and Behind a Character Face in Adobe Character Animator
How to make your character move his arms in front and behind the face? How to accomplish it without creating extra artwork? How to easily switch between those two modes? Learn here these Adobe Character Animator techniques.
For the character puppet to work properly in Adobe Character Animator * the artwork should follow a certain structure and naming convention. But if we follow all the rules we might encounter some issues. One of the common ones would be the inability of moving the hands in front of the character’s face.
There can be many reasons we will want to have the arms in front of the character’s face. For instance, if we want our character to perform a Pica-boo gesture, “Shh” gesture, send a kiss and so much more.
Combining front and back arms in one character might look tricky, but it can be achieved relatively easily and without performing almost any extra work.
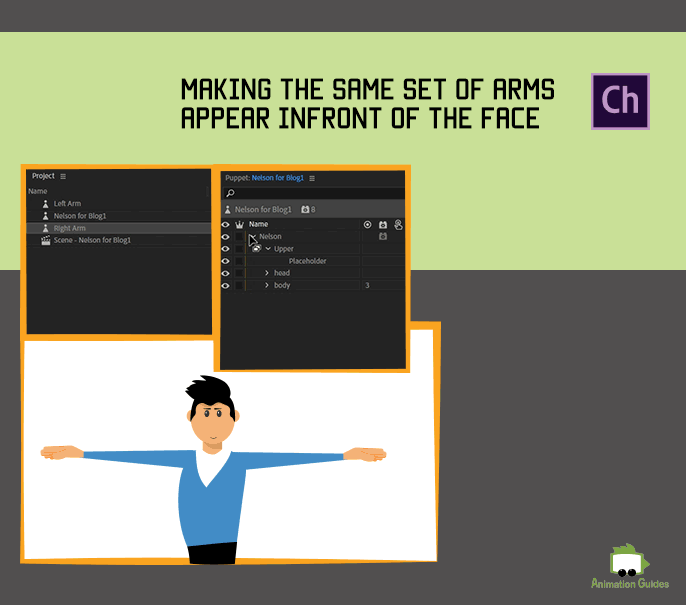
The Main Idea
We will want our character to have two sets of arms. One set in the layer beneath the head and another one on top of it. Doing that the traditional way would end up in bigger file size, double rigging work and extra work on every change we will later want to make to our arms and hands. We can avoid that! By taking advantage of the “make artwork shareable” feature in Adobe Character Animator we will be able to create two sets of arms in a click of a button.
Follow these 8 simple steps and your character will be able to move the arms in front and behind the face.
Step 1: Create the Arms
The first step would be creating the artwork for the arms in your design software. Follow the hierarchy that is advised by the Adobe community, just as you would do until now. Your left and right arms should be in the body folder. Under each arm draw the arm and put all the artwork for hand gestures in the left/right hands folders.
This tutorial focuses on building and setting up the arms of your character puppet. For an overview of the full puppet building process please refer to other tutorials.
Step 2: Prepare the "Upper" Group
Now it is time to make preparations for the front arms set. (We don’t need to create the arms themselves, but we need to create the folder/layer to place them later on).
Create a new layer (Name it anything you like, I named it “upper”).
Drag this new layer into our character hierarchy, above the head layer.
Draw a little square/dot (anything) on the character, and change its opacity to 1%.
Make sure it is placed as part of the “upper” layer.
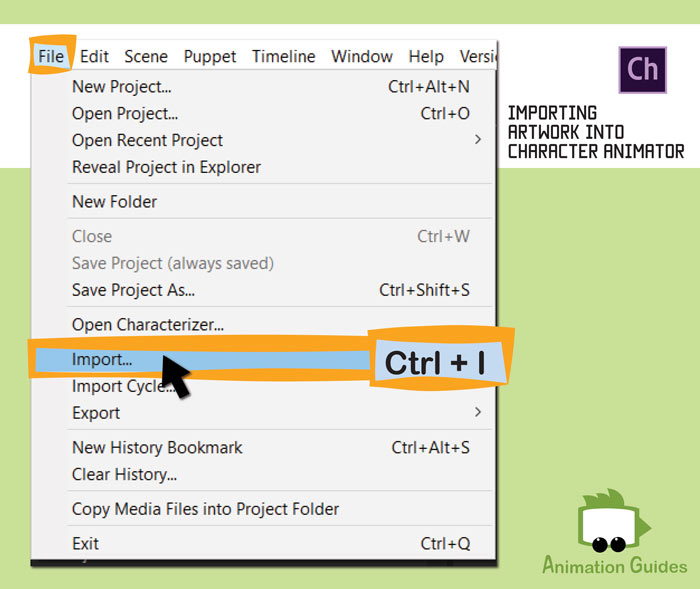
Step 3: Import the Character in Adobe Character Animator
Step 4: Create Arm IK Rig for Your Hands
Select left arm in the Puppet panel.
Use the puppet handle tool to mark the shoulder, elbow and wrist.
Tag each of them in the tags section in the properties panel.
Mark the wrist as “Draggable” (In the bottom part of tags section in properties panel).
Use the stick handle tool to draw a ‘bone’ between shoulder and elbow, then between elbow and wrist.
Repeat all the steps for the right arm.
Add “Arm IK” behavior to the upper level of the puppet.
Step 5: Create Gestures Swap Set
Click on the left hand’s folder with the right mouse button and select “Create Swap Set”.
Go to the triggers panel and assign keyboard keys for each of the gestures. (Enable ‘Latch’ option if you don’t want to keep holding the key to keep the gesture triggered).
Perform the same process for the right hand gestures.
Step 6: Make the Arms Shareable
With the right mouse button click on the left arm and select ‘make “Left Arm” shareable’. You will see the ‘Left Arm’ appear in the Project panel.
Do the same for the ‘Right Arm’.
Step 7: Drag the Shareable Arms into Our "Upper" Folder
Drag the ‘Left Arm’ from the project panel into the ‘upper’ layer we created earlier.
Select the attachment style to be ‘Weld’ the properties panel (under layer section).
Do the same for the right arm.
Step 8: Create Swap Set for Arms Switch
Click the + in the top corner of the triggers panel and select ‘Create new swap set’.
Change its name to something meaningful. ( I named it ‘Front and Back Hands’).
Drag the ‘Upper’ layer into the swap set.
Click on the +, once again and select ‘Create new trigger’.
Name it ‘Back Hands’. (Or something else…).
Drag the left and right arms that are placed inside the body.
Now drag the hall trigger (‘Back Hands’) into the ‘Front and Back hands’ swap set.
Mark one of the arm sets as default and assign a keyboard key to trigger the other one (Enable ‘Latch’ option for the last one).
Now What?
Now your character is ready for awesome animations. Create new triggers and swap sets. Create replays and start the production process.
Hey!
I'm a CG artist, designer and illustrator. I love to explore different creative forms, media types and artistic styles. Feel free to write me with your ideas, suggestions or requests.
Hi Raybo, thanks, I find this to be a useful feature as well. This way there is no need to switch between puppets when animating front and back gestures. The issue you are describing with the hand triggers should not occur. The trigger for each hand gesture should include the gestures of both hands
(front and back) , this way if you activate the trigger it will appear no matter which arms set is activated.
What the * means above
Please note, that the links that have * next to them are affiliate links and those help support AnimationGuides.com website. If you decide to purchase something through those links, we will get a small commission that will help us to continue and provide new free content on this website.
For you, going through those links is the same as clicking on a direct link. You will never pay more for products as a result of clicking on our links. If anything, that can actually help you get a better price since we can sometimes negotiate better deals for our readers.
The content on our website is not affected by the affiliate products and always reflects our honest opinion. All the reviews you will find on AnimationGuides.com are unbiased reviews. If a product we recommend does not have a supporting affiliate program, we will still link to it, just with a standard link without the *.


this is an anmazing feature – the only problem with it is that when switching hand triggers most of them stop showing neither in front nor on back
Hi Raybo, thanks, I find this to be a useful feature as well. This way there is no need to switch between puppets when animating front and back gestures. The issue you are describing with the hand triggers should not occur. The trigger for each hand gesture should include the gestures of both hands
(front and back) , this way if you activate the trigger it will appear no matter which arms set is activated.