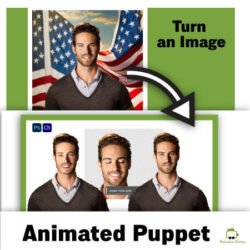
In this tutorial post, I will show you how you can turn your photo into a cartoon-looking animated puppet for Adobe Character Animator *. The puppet we will create will be able to automatically lip-sync to any audio and can be controlled by our head movements and facial expressions. We will get a reusable animated character that can be added to videos and presentations.

The Main Idea
We will use Adobe Photoshop * to separate the different facial elements, apply the necessary filters to create the cartoon effect, and finally structure the layers in a way Adobe Character Animator will recognize them.
In the end, we will import the .psd file we created into Adobe Character Animator. Then with a few simple clicks, we will turn our static layered cartoon image into an animated puppet full of life.
Follow these 15 steps and you will transform your static image into a working animated puppet:
Step 1: Gather Images
You will need a few images of yourself or the person you want to turn into a cartoon character. The first image will be used as a base for our puppet. The face on the base image should be with a neutral expression, open eyes looking forward, and a straight head (no tilts).

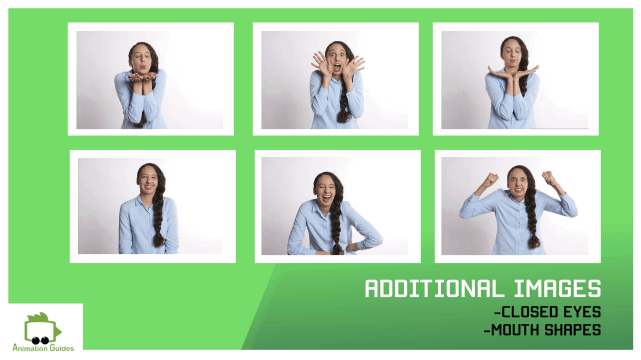
For this tutorial we used images of female character created by Robin Higgins from Pixabay.
We will also need an image of the same character but with closed eyes. And a few other images with different mouth shapes.
Ideally, you would have images of the full set of phonemes: Aa, Oh, Uh, Ee, R, L, F, M, W-oo, S, and D. As well as an image with a smile and surprised mouth expression.
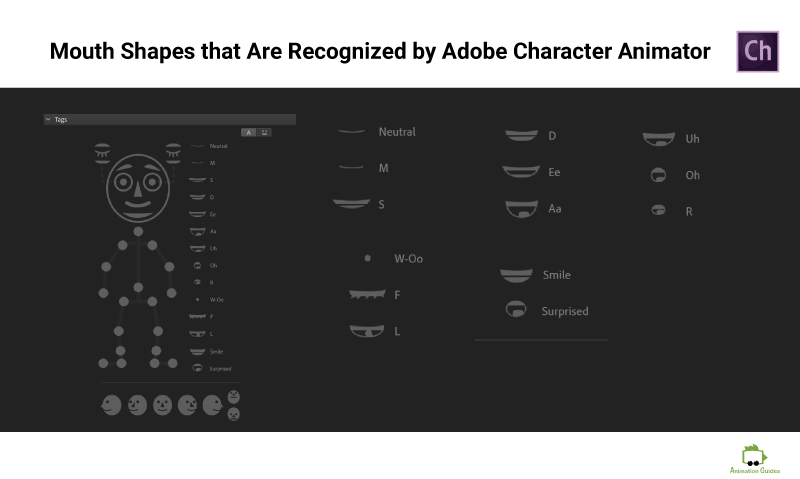
It is possible to build a puppet by using photographs with just 4 facial elements: the neutral face, closed eyes, and opened mouth face. However, the more visemes you will include, the more expressive puppet you will get at the end.
Step 2: Start with the Base Image and Separate the Background
- Select the base image (the one with the Neutral Face) and open it in Adobe Photoshop.
First step would be separating the character from the background.
To do so:
- Click on the quick selection tool then click on "select subject" button at the top panel.

- Once the subject is selected, you may adjust the selection by pressing the "select and mask" button at the top panel.
- Once you are happy with the selection, press Ctrl+J (Cmd+J on Mac). That will copy the selection and paste it to a new layer.
Step 3 : Separate the Head from the Rest of the Body
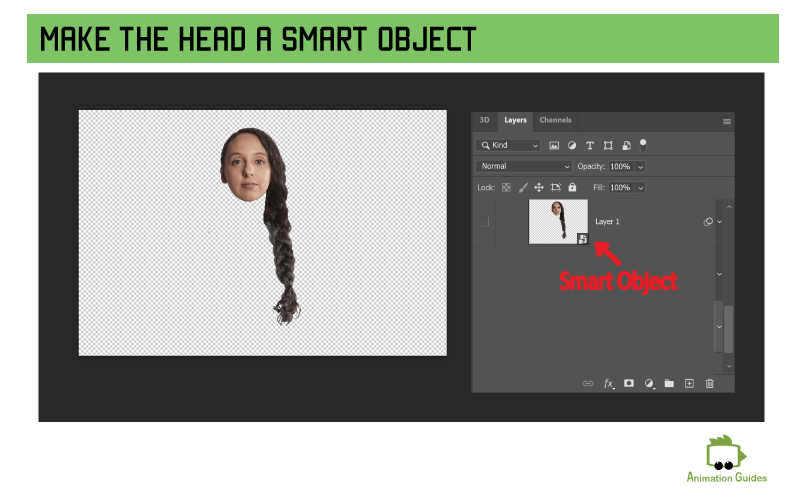
Now select the head and paste it to a new layer as well. Once it is done, turn the head into a smart object and bring it to a new document.
Step 4: Create the Cartoon Effect In Photoshop
The next step would be applying some Photoshop filters and adjustment layers to achieve the cartoony look of the character.
4.1 Lets Add the Filters
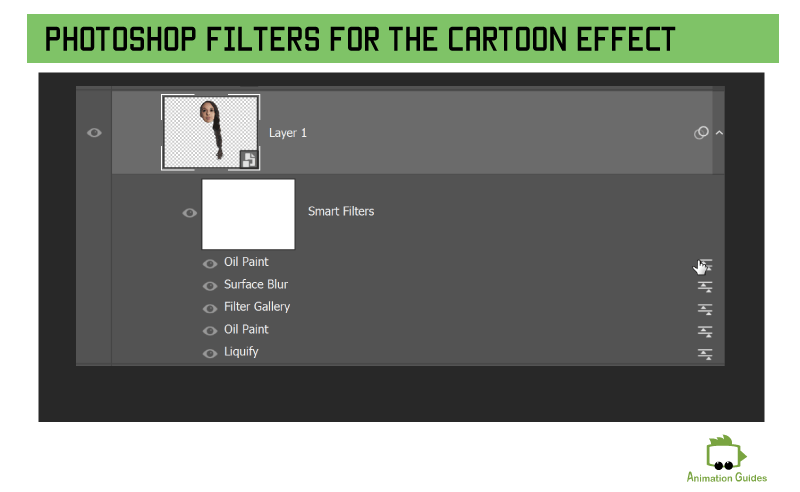
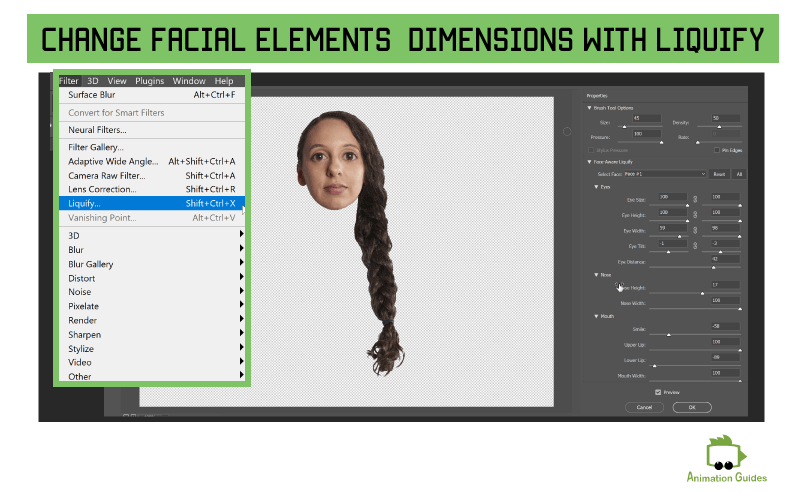
- Apply a Liquify Filter to the smart object layer, select Face-01, and adjust the size and the positions of eyes, mouth, face shape, etc.
- Apply Oil Paint Filter

- Apply Poster Edges Filter from the Filter Gallery [- Artistic-]

- Apply the Surface Blur Effect

- Apply Oil Paint Filter Again
Use the same settings as before.
4.2 Time for the Blur Layer
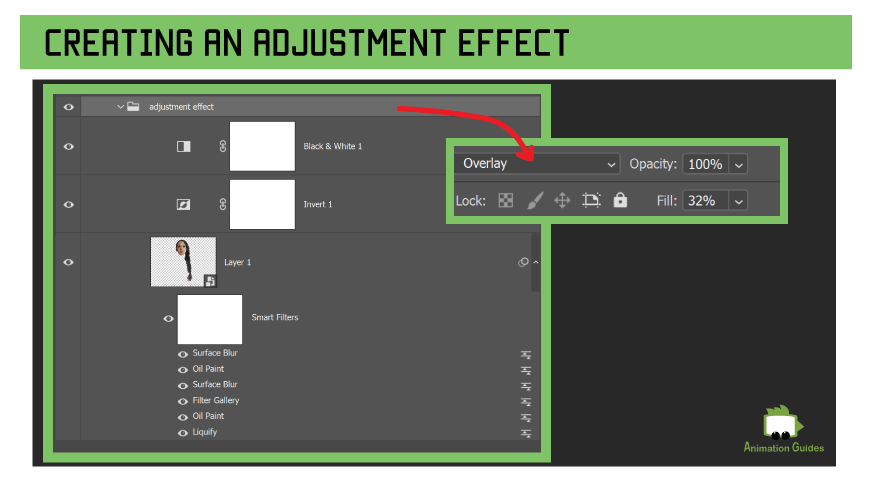
- Duplicate the smart object layer with all the smart filters on it
- Apply Surface Blur Effect
- Add an Invert Adjustment Layer
- Add Black and White Adjustment Layer
- Select the layer with the surface blur effect and the 2 adjusment layers you just add and group those together
- Set the blending mode for the group to Overlay
- Adjust the opacity of this group to ~30%
4.3 Next: Adjustment Layers

- Add a Vibrance Adjustment Layers
- Add Exposure Adjustments Layers
Step 5: Group the Effect for Later Use
The first thing we will do once the cartoon effect is created is to group all the related layers into one folder. It is important to keep our project organized to be able to create the required puppet structure. Group all the layers we created so far and call the group “cartoon effect”.
- Select all the layers and groups we created for the effect and group them
- Name the group cartoon effect
- Duplicate the cartoon effect folder
- Flatten the duplicated group
To flatten the group into a flat image, right-click on the group with the mouse and select “Merge Group”. We will use the newly created layer as a base for our facial elements.
Step 6: Separate the Facial Elements
To be able to animate the different facial elements those should be separated from the full-face image and placed on their layers.
1: Eyebrows

- Select the Lasso tool and draw around the right eyebrow on the flattened face layer.
- Click ctrl+j to copy the selection to a new layer (Cmd+J on mac)
- Name the created layer : +Right Eyebrow
- Follow the above steps for the Left Eyebrow
2: Hair

- Next we will select the Hair
- Ctrl+j to move the selection to a new layer (Cmd+J on Mac)
- Name the layer: +Hair
3: Mouth

- Draw a selection around the mouth shape
- Ctrl+J (Cmd+J on mac) to move the selection to a new layer
- Name the created layer : Neutral
If the mouth shape you separated is not neutral then you should name the layer with the name of the matching phoneme.
- Select the "neutral" layer and group it
- Name the group "+Mouth"
4: Eyes
It is time to create the structure for the eyes. Eyes are a more complex facial element as those should not only be separated from the base face but have several individual elements on their own.
- Draw a selection around the right eye
- Ctrl+J to move the selection to a new layer (Cmd+J on mac)
- Name the created layer: lids
- Now make a new selection around the pupil (on the lids layer)
- Ctrl+J to move the selection to a new layer (Cmd+J on Mac)
- Name the new layer: +Right Pupil
If the isolated pupil is not a full circle, you will need to complete the missing parts. You can just use the regular brush and draw in the details or you can work with a clone stamp tool/patch tool to sample the missing area from the existing pupil. Alternatively, you can use a photograph with wide open eyes and separate the pupil from it.

- Now create a new layer , name it: Right Pupil Range
- Draw a big circle around the eye, which will be used as the eyeball
- Fill it with the color you will sample from the eyeball area
- Now it is time to remove the white and pupil area from the lids layer
5: Face Base

Once all the main facial elements were separated it is time to fill those with skin color on the face. You can select the area of each previously separated facial element and use content aware-fill on it. Alternatively, you can use the patch or clone stamp tool to achieve similar results. You should end up with a flat blank face.
Name the Layer Face.
Step 7: Structure the Elements that were created so far
- Select: eyebrows layers, mouth group, eye groups, face base layer, and group everything together
- Name the group: +Frontal
- Create another group from the "+Frontal" group, name it: Head
- Create another group from the "Head" group, name it: +Puppet

Step 8: Apply Cartoon Effect on the Additional Images
We can separate the new facial elements from the images using the lasso tool and apply the cartoon effect just on them.
Alternatively, we can apply the cartoon effect on the full-size images and do the separation on each image with the effect applied.

Since we saved the image we applied the cartoon effect as the smart object we just need to replace the image inside the smart object file and save it.
We will start by adding the effect to the image with closed eyes. It also has an additional mouth shape.
- Start by adding the effect to the image with closed eyes.
In our example, the blink image also has an additional mouth shape.
- Once the cartoon effect is applied, duplicate the cartoon effect group folder again. Then merge the duplicated group.
- Cut out each of the closed eyes with the lasso tool and move it to a new layer.
- Name the closed right eye layer -- > right blink, and the closed left eye layer --> left blink.
- Now cut out the new mouth shape and place it to a new layer.
- Give the new mouth layer a new name matching the phoneme it represents. In our example that would be Aa.
- Move the blink layers to the right eye and left eye folders correspondingly.

- Place the "Aa" layer into the the mouth folder.
- The size and position of the new elements might require some adjustments to fit the vase face and previous expression.
- Hide the new layers once all the adjustment are made.
Step 9: Bring in the Body
Do the same thing we did for the images and facial elements for the extracted body. Bring it into the smart object and create a flattened body image with the cartoon effect on it. Once it is created put it inside the body folder.

Step 10: Structure the .psd Document and Name the Layers According to Puppet Rules
The final .psd file must have a very specific layer structure and layer names for Adobe character automatically apply the expected facial behavior on it.
This is the structure we should currently have:
- Puppet
- Head
- +Frontal
- Hair
- +Right Eyebrow
- +Left Eyebrow
- +Mouth
- Neutral
- Smile
- Surprised
- Aa
- Ee
- Oh
- Uh
- W-oo
- M
- L
- F
- S
- D
- R
- +Right Eye
- Right Blink
- Lids
- +Right Pupil
- Right Pupil Range
- +Left Eye
- Left Blink
- Lids
- +Left Pupil
- Left Pupil Range
- +Nose
- Face
- Body
Step 11: Resize the Head / The body
Next, you might want to do some size changes to make the character look more cartoonish. That can be accomplished by making the head larger (or the body smaller). If you decide to change the head size make sure you apply the transformation to the entire head folder so all the facial elements will be adjusted.

Step 12: Remove unnecasary layers
Now the photoshop file is almost ready to be imported into Adobe Character Animator. We need to clean it up from all the unnecessary folders and layers. The cartoon effect folder is no longer needed so just delete it. The clean .psd file should have one main folder called puppet and 2 folders (head and body) inside it.
You might want to keep a backup version of .psd with the cartoon effect folder so you can get back and easily add additional facial elements in case you need them.
Step 13: Import the document into Adobe Character Animator
- Open Adobe Character Animator
- Make sure you are in the rig mode
- Go File-- > Import and select the .psd file we just created

Step 14: Make Few Adjustments
- Select the head in the puppet hierarchy then move the origin circle to the bottom of the head
- Select the +Frontal, and move the origin circle to the same place

- Select the body, then select the stick tool and draw a horizontal line at the bottom of the body. Next go to the tags panel and tag this stick line as FIXED.

Step 15: Go to Record Mode and Test Your Puppet
- To create a new scene drag the puppet file from the in the project panel to the scene icon.
- Once a new scene will be created you will see your puppet in it. However, the size of the puppet might not fit the scene. Best way to adjust it is by adding a new camera to the scene.
- Go to Scene --> New scene camera.
- In the properties panel: change the zoom and position values to make the character fit the screen.

- Now select your puppet in the timeline. Make sure the camera input and voice input * is activated. Move your head in front of the camera and say something. The puppet should follow you.
Now What?
Now your character is ready for animations. You can record external audio and automate the lip-sync for the new puppet. You can also record the audio inside the Adobe Character Animator itself. You can also add additional behaviors (like a body behavior for example), tags, or elements to make the puppet more expressive and fun to work with.
Stay tuned for new tutorials.
Shop Related Products:
- Facebook32
- Twitter8
- Pinterest1
- Email7
- Subscribe
- 48shares


