Step-by-Step Guide: From a Photo into Animated Puppet using Photoshop Neural Filters
Transform just one static image into an animated puppet for Adobe Character Animator. How to make a static image talk? Which Vismes are required? And how to generate those from just one photograph?
Realistic puppets in character animation serve as valuable assets for creating dynamic explainer videos, interactive educational apps, virtual events, webinars and more. Those can simplify complex concepts and captivate audiences across various platforms.
As we’ve explored in a previous post, creating realistic puppets for Adobe Character Animator involves a series of photos capturing different poses and facial expressions. But what if you’re aiming to animate a character that doesn’t exist? Or only have one photo as a reference? That is where Adobe Photoshop *Neural filters may come in handy. In this post, we will go through the entire process of transforming a single realistic image into an Adobe Character Animator * puppet.
The Process
Generating a source image
Separate Main Areas
Create Mouth shapes for Lip sync using Neural Filters
Create Eye Hierarchy
Separate Eyebrows
Clear Face Base Layer
Fill in the neck area
Structure
1. Getting a good base image
The first step would be getting a good base image to work with. If the puppet needs to resemble a specific person, a clear photo of that individual is necessary. Sometimes, you just need a puppet with specific traits. In that case, you might get an image from a stock website or use AI to generate one.
In this example, we used the second method. We generated an American Male character using Adobe Firefly *.
Besides the male character, the generator also added an American Flag as a background.
2. Begin Separating
First step would be to remove the background. We will do it by selecting and masking the subject in Photoshop. Next, we will separate the body and the head.
Creating the Mouthshapes
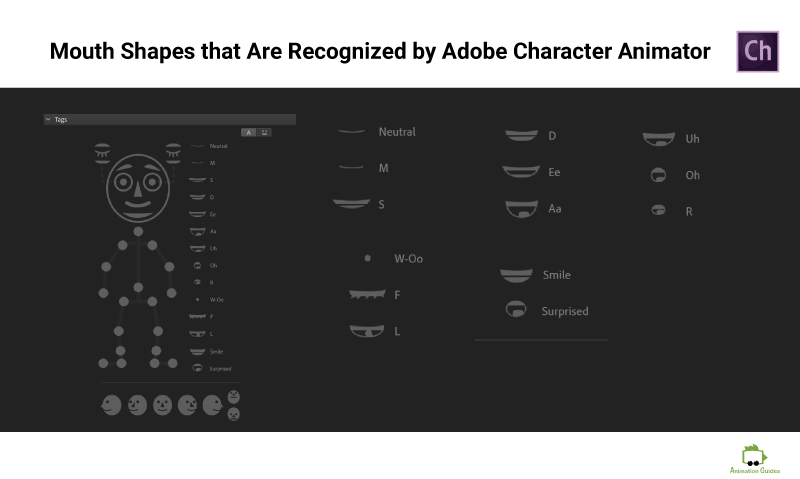
Before separating all the facial elements from the base face, we will use the Neural filters in Adobe Photoshop to create the mouth shapes for Lipsync. The filter uses the entire face and therefore we will separate the eyes, ears, etc after we finish making the mouth shapes.
The mouth shapes that Character Animator recognizes are:
Neutral
M
S
D
Ee
Aa
Oh
Uh
R
Smile
Surprised
F
L
W-oo
To make mouth shapes, we will create a separate folder we will name +Mouth. We will then duplicate the separated head 14 times (a layer for each mouth shape). We will name each layer with a name matching the visme.
We will now select the upper mouth shape layer, select the entire face. Then click Filter in the upper Menu and select Neural Filters. We will work with the “Smart Portrait” Filter.
The settings we will need to tweak to create various mouth shapes greatly depend on the initial image we start with. Sometimes we will need to apply the same filter several times to achieve a desired mouth shape.
The settings we may need to adjust are:
Happiness
Surprise
Anger
Making Surprised Mouthshape
To make a surprised mouth shape from our original image, we tweaked the “Surprise” slider in the neural filters, smart portrait settings.
Neutral/M mouth shape
To close the mouth (for a neutral or M mouth shape) we lowered the happiness setting to minimal. Then applied the neural filters once again with a -16 happiness value.
S/D mouth shape
L mouth shape
F mouth shape
Mouth shapes with lower teeth
Some mouth shapes, like Ee, require well shown lower teeth. Those can not be created just with neural filters. However, the lower teeth can be easily added by selecting the upper teeth and reflecting them into the lower mouth. Masking the teeth, merging the layers and running a neural filter over the new face will generate an Ee mouth shape.
Oh - Mouth Shape
To make O mouth shape, we used previously created Ee mouth shape and applied the Neutral filter on it. Lowering the value of happiness was enough to get the result.
Masking the mouth
Once all the mouth shapes are created, we will need to mask the lower face area for each of the mouth shapes.
Preparing the eyes
To convert static eyes into eyes responsive to facial movements in Adobe Character Animator, several steps need to be implemented.
Creating blinks
The character in our picture has open eyes, and we do not have a photo with closed eyes. Luckily, we can use the built in Generative Ai in Adobe Photoshop to overcome this issue.
Separating the blinks
Now we need to separate the generated closed eyes to left and right blink. For that we will just duplicate the generated layer. Remove left blink from one of them and right blink from the other. Then we will name each of the layers: Right Blink, Left Blinks.
Eye Hierarchy
In order for Adobe Character Animator to accurately recognize the eyes, they should be structured very specifically.
Eyebrows
Next step would be to separate the eyebrows and replace the blank area below them with skin like texture.
Each eyebrow should be placed on a separate layer and named “+Right Eyebrow” and “+Left Eyebrow” accordingly.
Face Base
Below all the facial elements in the head hierarchy, we should place the base face layer. The face base layer should be clear of eyes, eyebrows, and other moveable elements. That can be easily accomplished using Photoshop tools like Healing Brush, Remove Tool, And Ai Generator.
Neck
We should now fill the neck area that was left blank after the head was separated with a neck like texture.
Structure
This is how our puppet is now structured:
Conclusion
After generating all the required mouth shapes for lip-syncing and ensuring that all facial elements are correctly named and ordered within the proper hierarchy, the puppet is ready to be imported into Adobe Character Animator. Unlike body ports that need to be rigged, the Software automatically recognizes facial elements. That means you can see the character come to life once you place the imported puppet into a new scene.
Hey!
I'm a CG artist, designer and illustrator. I love to explore different creative forms, media types and artistic styles. Feel free to write me with your ideas, suggestions or requests.
I’ve been following your blog for some time now, and I’m consistently blown away by the quality of your content. Your ability to tackle complex topics with ease is truly admirable.
Please note, that the links that have * next to them are affiliate links and those help support AnimationGuides.com website. If you decide to purchase something through those links, we will get a small commission that will help us to continue and provide new free content on this website.
For you, going through those links is the same as clicking on a direct link. You will never pay more for products as a result of clicking on our links. If anything, that can actually help you get a better price since we can sometimes negotiate better deals for our readers.
The content on our website is not affected by the affiliate products and always reflects our honest opinion. All the reviews you will find on AnimationGuides.com are unbiased reviews. If a product we recommend does not have a supporting affiliate program, we will still link to it, just with a standard link without the *.


")


I’ve been following your blog for some time now, and I’m consistently blown away by the quality of your content. Your ability to tackle complex topics with ease is truly admirable.
Thank you for your positive feedback