Step-by-Step Guide to Installing and Using Stable Diffusion AI
A beginner's guide to installing and using the extended free version of stable diffusion AI image generator. All important settings are explained.
Stable Diffusion is a fantastic new tool that uses AI technology to generate high-quality artwork for free. This software allows people without special artistic or technical skills to use computers to create beautiful, eye-catching images that look like real artists made them.
In this post:
Who Should Use Stable Diffusion and Why?
Stable diffusion can save time and money associated with manual image creation. It can be used both by amateurs who are passionate about art as well as by professionals that want to speed up their work process or even enhance the quality of their work.
Video game design, graphic design, book illustrations, cartoons, comic books, advertising, architecture, interior design, fashion industry, augmented reality, medical visualizations, e-commerce, and event planning visualizations are just a few of the fields this technology can be useful for.
How to Run Stable Diffusion?
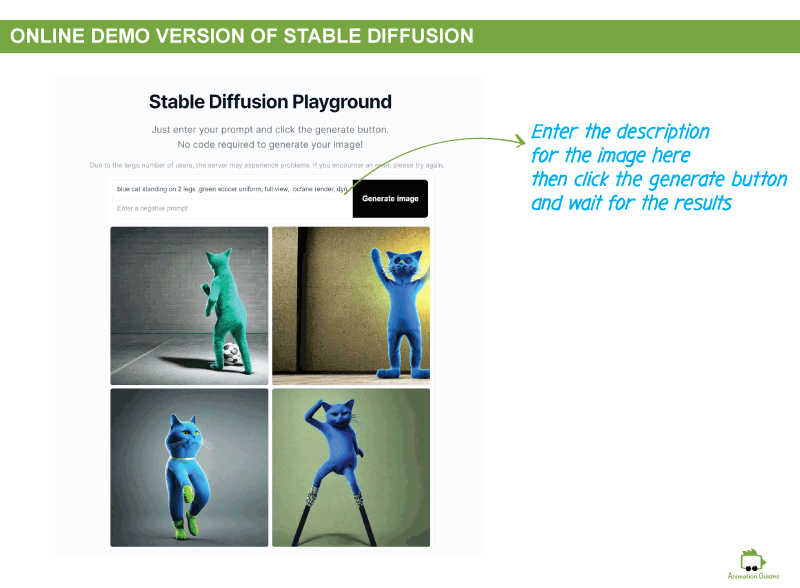
The easiest method that does not require any installation is to use the stable diffusion demo version available online. This version allows you to generate images based on text prompts and is really good for newcomers that just want to get the feel of this new technology. However, this version is very limited and missing lots of advanced options that are available in the stand-alone download extended version of the software.
How to Install the Extended Version of Stable Diffusion on Your PC?
Downloading Stable Diffusion may be a little technical and is probably the most unpleasant part of anything related to this software. However, being able to use the full version is worth it. And it is actually a breeze if you just follow the steps. Just think of it as a fun, new adventure in the world of technology! With clear instructions and a bit of patience, you’ll be up and running in no time!
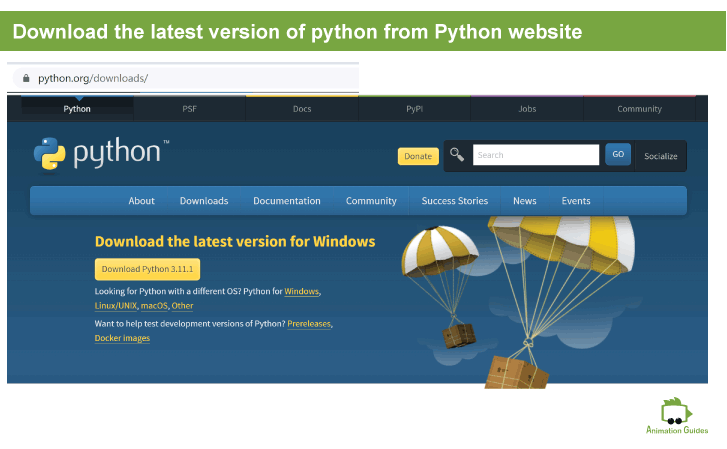
Run the launcher, and keep everything as it is. Make sure the lowest checkbox with the option of “Adding Python.exe to Path” is checked.
Step 2: Download & Install Git
Download git from the git website and run the launcher.
Step 3: Create a Folder for Stable Diffusion
Create a dedicated folder, you can call it stable diffusion (or any other name you prefer). Make sure the drive you create the folder on has enough available space on it. You need to make sure there is at least 10 GB of free space.
I will create it on E://
Step 4: Get the Web UI for Stable Diffusion from Git
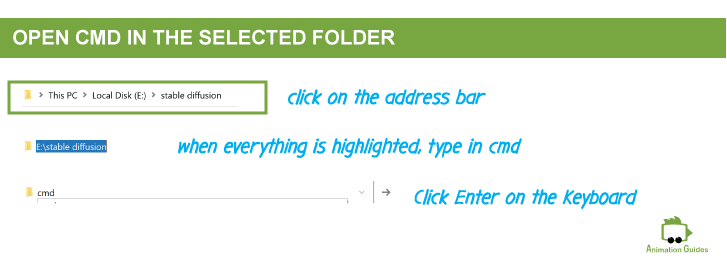
Open the folder you just created for stable diffusion
Click on the address bar
Once the address bar is highlighted, type cmd in the bar and press Enter on the keyboard
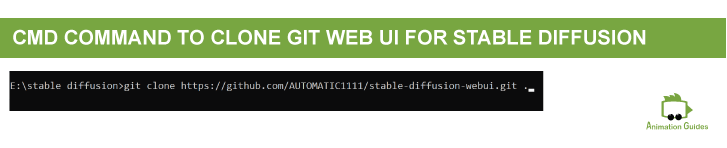
a command window will open up, type in the following command: git clone https://github.com/AUTOMATIC1111/stable-diffusion-webui.git .
Step 5: Download the Stable Diffusion Model
Now it is time to download the stable diffusion. We will download the 1.5 model version. Please note that once you get familiar with using one model it is advised to experiment with the other models as well. Different models can give different results and be better suited for specific art styles or image types.
There are 2 .cpkt files available for download on that page. The first one is called v1-5-pruned-emaonly.ckpt and it weighs around 4 GB. The second one is called v1-5-pruned.ckpt and is about 7 GB in weight. Download the one that weighs less ( v1-5-pruned-emaonly.ckpt).
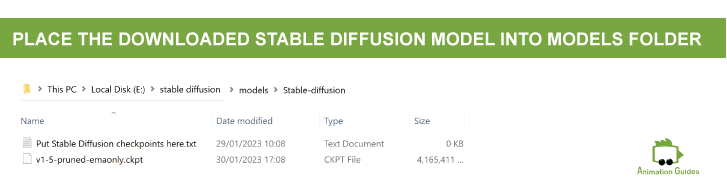
Once the download process is finished, move the downloaded file into the models–>Stable-Diffusion folder that is in the main stable diffusion folder we recently created.
Step 6: Adjust the webui-user.bat File
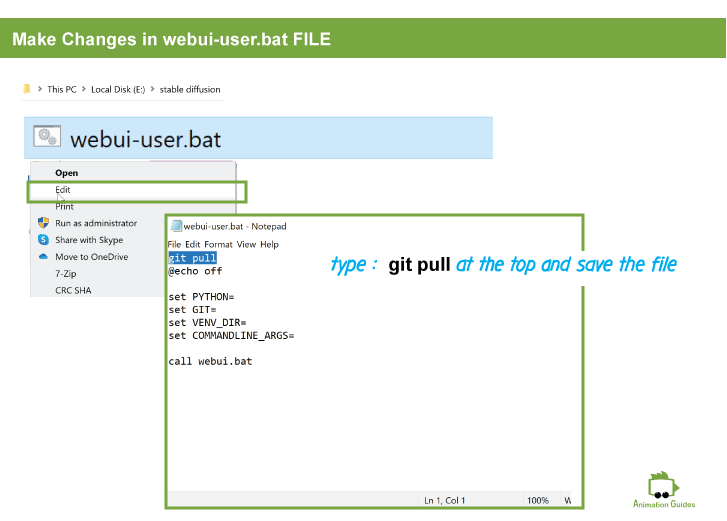
Now in the main stable diffusion folder, find the webui-user.bat file. Right click on it and select edit.
Type in: git pull at the top of the file and save it.
Step 7: Run the webui-user.bat File
Double-click the webui-user.bat file we modified earlier. That will open a command window. It will now run the process and in the end, a link for a web browser will be provided.
We will need to run this file each time we want to open stable diffusion on our pc. Running this file for the first time may take some time. Afterward, this will be much quicker.
Once the process is completed you will get a message similar to this: Running on local URL: “http://your local url”. Copy that http link into a web browser URL tab and stable diffusion should now be running.
Improvements
You can set stable diffusion to launch on its own after running the webui-user.bat file. To do that, enter the edit mode of the webui-user.bat file again. Add the following line: --autolaunch after the set COMMANDLINE_ARGS=
How to Use Stable Diffusion Software?
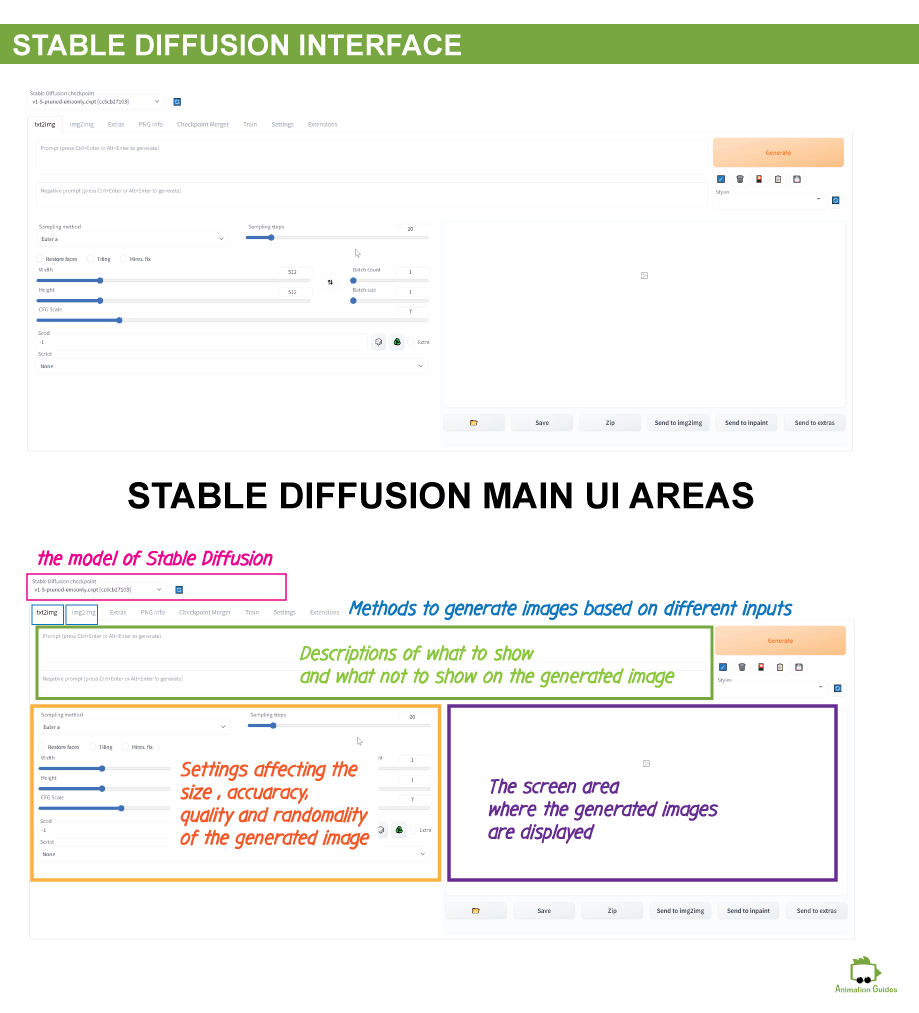
Once you enter the local URL into the address tab in a web browser, the webui for stable diffusion will open up and it will look something like the image below:
You can see there are lots of options and we will go over those in detail. But you can start using the software right away just by typing a description in the prompt field and clicking the generate button. Very quickly you will realize that every little change you make in your description greatly affects the image created by this ai engine.
Exploring the User Interface of Stable Diffusion
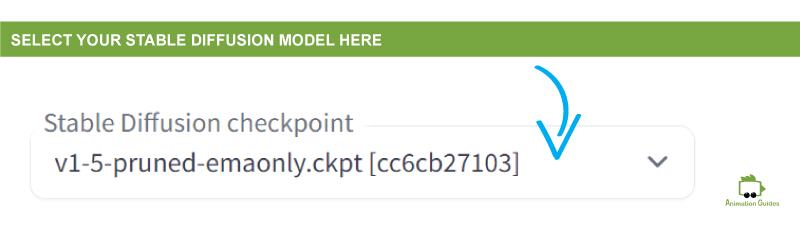
At the top left corner of the stable diffusion window, you will see a dropdown menu with the title Stable Diffusion checkpoint. That is where you can select the stable diffusion model you want to run the generator with. At this point most likely you only have one option (the one described in this post).
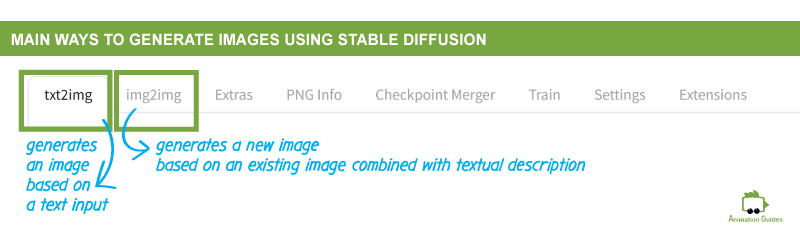
The webui we installed for the software gives us 2 main ways to generate images:
Text to Image Generator
This method generates an image based on a written description, which is also called a propmpt.
Image to Image Generator
This method generates a new image based on an existing image together with textual description.
Getting to Know the Stable Diffusion Text to Image Generator Interface
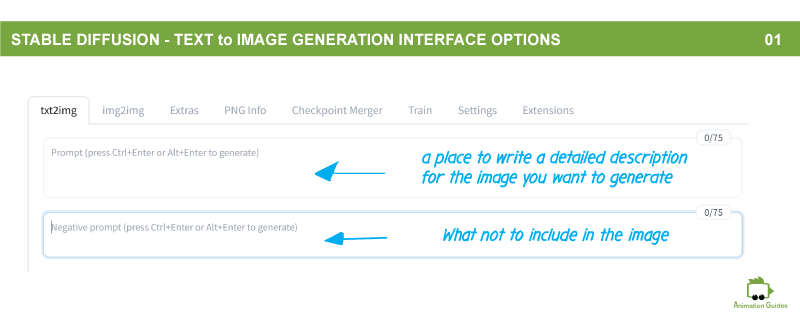
Prompt Fields
The first fields to get familiar with are the prompt fields. Those are the fields you use to type in the description of the image you want to generate. The description should be as clear and as detailed as possible.
Below the main prompt field, there is a negative prompt field where you can type in descriptions of things you do not want to appear in the generated image.
Knowing how to build a good prompt is a crucial part of being able to generate an impressive image using any ai image generator.
In the near future, I will publish an entire post dedicated to building prompts that give good results.
Sampling Steps & Sampling Methods
Next options are the sampling methods and the sampling steps:
Sampling Steps
The number of sampling steps has an impact on the level of detail and refinement in the generated image. The higher the number of sampling steps, the more detailed and polished your image will become but also the longer it will take to generate it.
Sampling Method
The sampling method refers to the algorithm used to generate images based on the provided prompt. Some sampling methods will result in more stylized artistic images while others may produce more photorealistic results.
Checkboxes: | Restore Faces | Tiling | Hires. Fix
Below the sampling steps and methods, there are 3 checkboxes: Restore faces, tiling, and Hires. fix.
Restore Faces
A feature that makes sure faces in the generated image look natural and accurate.
Tiling
This feature can be useful for creating patterns.
Hires. fix
This feature helps improve the quality of the generated image by adding details and making it look clearer.
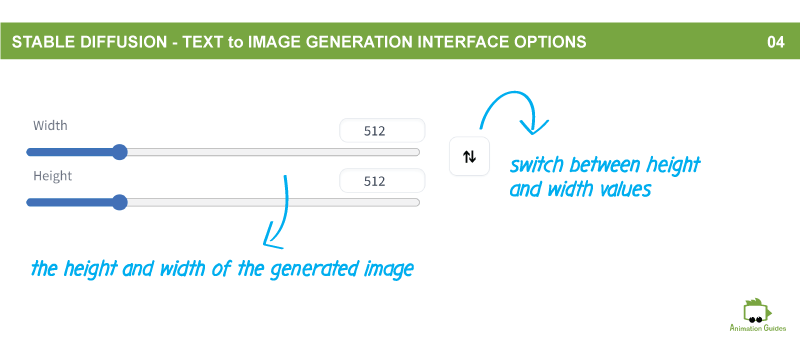
Dimensions
Next, there is the size control where you can specify the width and height of the image you want to generate.
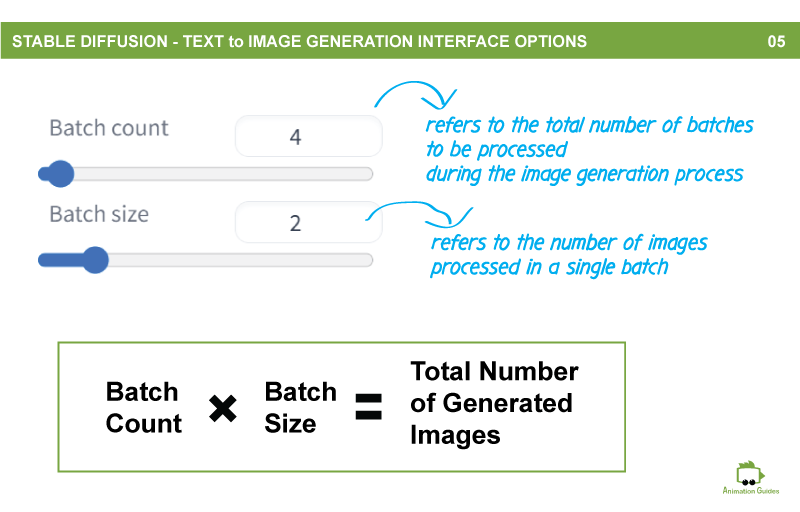
Batch Count & Batch Size
Batch size and batch count are closely related terms and a standard user might find it difficult to differentiate between those two. Batch size defines the number of different images the software will generate in one iteration (the max number of such images per iteration is 8). While batch count (which can be set up to 100) determines the total number of iterations performed. The total number of generated images is the multiplication of the batch count and batch size values.
Batch Count * Batch Size = Total Images Generated
CFG Scale
The cfg scale value affects the level of similarity between the generated image and the text description used to create it. The value is in the range of 1 to 30. The higher the cfg scale, the more closely the generated image will resemble the prompt, and vice versa.
Seed
The seed number affects the randomosity of the generated image. When set to -1 ( which is the default value) each generated image will be completely random. The same seed value will produce the same results every time it is used. The seed number of each generated image can be.
When clicking on any generated image, the information with generation values and among those the seed value is displayed below the image.
You can test how changes in different settings affect the image by generating an image with the same seed number and applying changes in the values of cfg scale, sampling methods, sampling steps, description, etc…
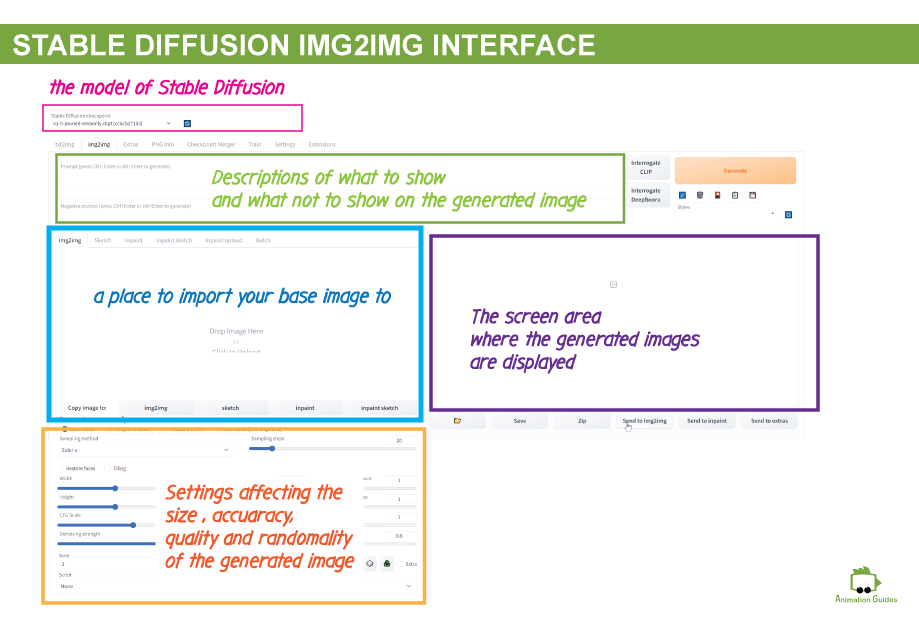
Getting to Know the Stable Diffusion Image to Image Generator Interface
If you felt stable diffusion is powerful until now, let’s see how you will feel about it after using the image-to-image generator options. To get there you just need to click on the image2image tab next to the text2image tab we were in before.
Basically, this tab is a more advanced version of the previous tab that allows us to guide the algorithm to create the image we want not just using textual descriptions but also visual ones.
Although this interface may look a bit intimidating at first. Almost all the settings we covered in the text2image interface are present here. At the top, we still have the place to enter our prompt and negative prompt. The width and height, cfg level, sampling methods, sampling steps, batch size, and batch count are all here at the bottom of the screen.
At the main part of the interface, we have a place to upload our images. The image we upload here as a starting point can be anything really. It can be a photograph, can be a sketch a very rough sketch of how we want our composition to look, and it can also be a base image we previously generated with the text2image interface but we want to improve.
Denoising Strength
A new setting you will find at the bottom area (below the CFG Scale) is denoising strength. This setting affects how similar the newly generated image will be to the image uploaded. the value can be set in the range of 0 to 1. If set to 0 the image will remain exactly the same as the one you started with, if set to 1 it will be completely different.
The cool and extremely powerful thing about this editor is that you can replace the uploaded image with the generated image when you feel it is becoming closer to the end result you want to achieve. Then use that image as the base and run the generation with a prompt and the other setting on that new image until you get even closer. then you can replace the base image once again, and repeat that process until you get exactly what you want.
Now What?
Installing Stable Diffusion and getting to know the interface is a great start but that is just a door into a powerful and magical world of ai image generation. It is now time to test and analyze the different settings to see which combinations give the best results. Learn how to structure good prompts, and explore additional tools that can be used in combination with stable diffusion to the process even less effortless.
Hey!
I'm a CG artist, designer and illustrator. I love to explore different creative forms, media types and artistic styles. Feel free to write me with your ideas, suggestions or requests.
Thank You for letting me know. Everything in the Ai Field changes very fast. There is a newer version now than the one I used in the post. I updated the link with the newer one.
Alex
3 years ago
Just wanted to say thanks for this “little” guide/tutorial. Everything is detailed and well explained, aind it was a great help in my discovery of SD and all it can do.
Since each day brings new fascinating advancements in everything related to ai it is hard to imagine that a book can stay up to date for too long. But there are some great youtube channels for generative ai and specifically for stable diffusion: Aitrepreneur Olivio Sarikas
egest
3 years ago
how do you fix a ‘torch can’t use GPU’ error in the webui.bat file?


")
Link to hugging face is broken
Thank You for letting me know. Everything in the Ai Field changes very fast. There is a newer version now than the one I used in the post. I updated the link with the newer one.
Just wanted to say thanks for this “little” guide/tutorial. Everything is detailed and well explained, aind it was a great help in my discovery of SD and all it can do.
Thank You for the positive feedback. Really happy this was helpful.
Complete novice here. I obviously have questions but have no idea who I ask and expect a reply. Are you aware of any books or tutorials on SD?
Since each day brings new fascinating advancements in everything related to ai it is hard to imagine that a book can stay up to date for too long. But there are some great youtube channels for generative ai and specifically for stable diffusion: Aitrepreneur Olivio Sarikas
how do you fix a ‘torch can’t use GPU’ error in the webui.bat file?
Not sure, but perhaps adding “–skip-torch-cuda-test” to COMMANDLINE_ARGS in the webui-user.bat can help