Step-by-Step Guide to Animated NFT Collections in Adobe After Effects
How to structure your animated NFTs? How to control traits and layers with expressions and dropdown menus? Download a script to generate a collection of any size in Adobe After effects.
Creating a 10K NFT collection became very popular. It is almost a must for every successful NFT project to have a collection of a similar size. There are different guides, including our own, on how to create a 10K nft collection of static images. But what if you want your art pieces to be animated? How can you automate the process and be able to quickly create an animated NFT collection of a large size? This guide will cover exactly that.
The Main Idea
We will be using Adobe After Effects * for animating and Adobe Media Encoder * for rendering. We will import pre-created static art pieces to AE. Pre-compose all the elements that construct our main art piece. Animate them *. Then we will use dropdown menu controls and expressions to switch between the different layers of each trait. Finally, when all the connections are created we will run a script that will randomize the different layers for each trait and render each generated item as its animated piece (it can be .gif .mp4 or any other format available in Media Encoder).
Follow these steps and you will be able generate an animated NFT series of any size:
Steps To A Complete
Step 1: Create the Static Art
There are many ways to create source art for our animated clips. We can create the art directly in Adobe After Effects or use external software like Adobe Photoshop *, Procreate, or Adobe Illustrator * to draw the different elements and their variations.
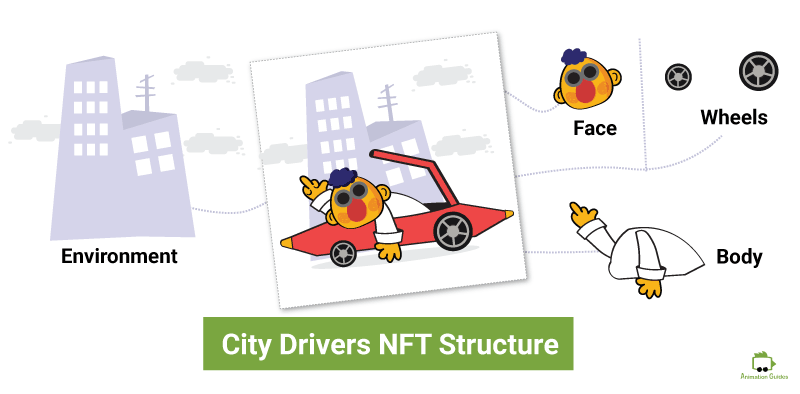
In our City Drivers Collection, we will use Adobe Illustrator to draw the different parts that will eventually be animated.
Just like when creating a static NFT collection, we will start by drawing our first art piece with one appearance of all possible traits separated into different layers. Then we will duplicate the artwork and make modifications to each duplicated trait.
However, there are more things to take into consideration when creating art for animation. Besides separating the artwork into layers that will later be used as traits, each element that will be animated should also be created on a separate layer.
Those are the different separated elements in our drivers collection:
The face is constructed from glasses, hats, hair, ears, cheeks, nose and the base face layer.
The car is constructed from top shape, bottom shape and wheels.
The body is constructed from right/left arms, right/left hands, and the base body layer.
And here are some of the trait variations for them:
Step 2: Import into After Effects
The next step would be importing the art for all the traits and layers into After Effects.
You can use the regular [ Ctrl+I ] shortcut or just go to File –> Import.
Another method is to use the creative cloud libraries. This way you can easily make changes and those will automatically update in AE.
Step 3: Create a Composition for Every Trait
Once all the traits and layers were imported, we will create a composition for each trait and bring all the layers (custom looks) for that trait into the composition.
If some of the traits are separated into different sub-traits, we will create separate compositions for them as well.
For example, our driver’s face will have separate compositions for the nose, ears, glasses, and hair.
For the body, we will create a separate composition for the base layer, and a different one for the arms. The order of the different custom looks in both arms and body compositions should be consistent to be later constructed into the same outfit. That is because the arms will be animated separately from the body in the main comp. But as for trait logic, both arms and body are the same traits.
Step 4: Create Animations
We will now create our animated composition. It can be as simple or as complex as you would like it to be.
You can just put all the traits-comps into the main comp and add some position/rotation movements.
Or you can make a final composition that will involve nested precomps.
It depends on the final output you would like to achieve.
This is how our City drivers animated NFT final composition is structured:
It consists of the animated car composition called “First-Piece” and the static bg composition.
The First Piece composition is constructed of several nested sub-compositions with animations for wheels, arm movements, the car tilts, and more.
Car Without Wheels Composition
Car Composition
CompToRender Composition
Step 5: Create Master Composition
Create a new Composition
Name it -- > Master Controller Composition
This will be a composition that will control the different customization we have for each trait.
Create a new Adjustment Layer
We will name it “Master Controller”.
Add a "Dropdown Menu Control" Effect
Go to Effects –> Expression Controls –> Dropdown menu control and add this effect.
Rename the effect with right mouse click on it
Rename this dropdown effect to represent the trait it will soon be controlling.
Edit and Add Items
Click on Edit Button (next to the effect name). It will open up a small pop-up window. You can now add and remove items. Add items to match the number of layers you have in the composition for that trait.
Step 6: Connect Dropdown Controller to Traits Compositions
Open the first trait composition.
We will start with the “wheels” comp in our example project.
Select the first layer and press "t" on the keyboard
The opacity parameter will pop up.
Click on the swirl icon to open up the expressions area
Add the following code for the expression
We will add an expression that will turn the opacity of the layer to 100%, in case its index matches the selected value in the dropdown menu. If the index will not match, the opacity of the layer will be 0.
Start with:
var CurrentItem =
Now click on the swirl icon and drag it to the “dropdown menu controller” you just created on the master controller.
Add “.value” at the end of the first code line.
var CurrentItem = comp("Master Controller Composition").layer("Master Controller").effect("Wheels")("Menu").value;
Now we will add the if expression. The final code will look like this.
					var CurrentItem = comp("Master Controller Composition").layer("Master Controller").effect("Wheels")("Menu").value;
if (CurrentItem==index) {100} else {0};
Edit -- > Copy expression only
Select the opacity parameter for the first layer. Go to Edit Menu and select “Copy expression Only”.
Select all other layers and Click Edit--> Paste
This will paste the created expression to all the layers in the composition.
Now you can control which wheel appears in the main composition just by changing the selection in the dropdown menu.
You will need to do this step for all the created traits compositions. In our project, we will have drop-down menus for shirts, car bases, car roofs, wheels, hats and hair, noses, glasses, ears, backgrounds, and hand gestures.
Step 7: Run a Generation Script
At this stage, you should already have the main composition all the elements in it can be triggered by changing the values in dropdown menus on the Master Controller.
Now it is time to write a script that will allow you to automate the render process.
If you are not into coding, you can just download the script and run it.
To make the script work in your project there are few things you need to do: 1. Make sure the Maser Controller Composition is named "Master Controller Composition" and the Controller object is on the first layer in that composition. 2. Name the Main Composition you want to render "CompToRender". 3. Open Media Encoder [The script assumes Media encoder is opened, otherwise it won't work]. 4. Render one instance manually using the render setting you want for your collection. 5. Keep the Media Encoder Open. 6. Go to File--> Scripts--> Run Script File and run the script you downloaded here. 7. The script will ask you what size of a collection you want to create. Enter that number in the field. ( Test rub first using a small value)
This script will assume that Adobe Media Encoder is open and will preserve the render settings that were used in the last render.
So before you run the final script make sure that Media Encoder is open. And make one manual render using a Media encoder with the settings/format you would like to be used for the entire collection.
This is the code of a function we will use for the rendering. It gets the composition and sends it to Media Encoder for rendering.
					function MediaEncoderRenderFunc(comp)
{
	//This function renders in Adobe Media Encoder while Media Encoder is opened, it uses previous render settings.
	//So make sure you manually render one item to get the right settings, before running this script for the entire collection.

	var b_talk=  new BridgeTalk();
	if(!BridgeTalk.isRunning("ame")){
		BridgeTalk.launch("ame","background");
	}
	var renderItem=app.project.renderQueue.items.add(comp);
	var module=renderItem.outputModule(1);
	module.file=File(pathToSaveCollection+'/'+ renderCompName);
	app.project.renderQueue.queueInAME(true);
}
Now we will write a function for generating the collection.
					function GenerateCollectionBasedOnSize(renderComp,MasterComp)
{
......
}
First thing is to get hold of the master controller object with all the dropdown menu effects on it. We assume that this is the first item in our Master Controller Composition.
var masterControllerObject = MasterComp.layer(1);
Since we control each trait with its dropdown menu, the total number of traits is the total number of effects on the master controller adjustment layer.
					// Based on Traits = the total number of effects on MasterController

	var TotalNumberofTraits= masterControllerObject.property("Effects").numProperties;
We will now create an array named “TraitsAndLayersArr” and populate it with all the possible options for the different traits.
	var TraitsAndLayersArr={};
	for (var i = 0; i < TotalNumberofTraits; i++)
	{

		TraitsAndLayersArr[i]=masterControllerObject.effect(i+1)("Menu").maxValue;

	}
Next would be asking the user for the size of the collection he wants to create:
					var CollectionSizeSTR = prompt("What is the collection size", "");
	var CollectionSizeINT =  parseInt(CollectionSizeSTR);

	alert("we will generate a collection of  " + CollectionSizeINT + " nfts ");
Now it is time for creating the collection. We will run a for loop based on the number you entered in the alert window earlier.
					var generatedCollection={};

	for (var h = 0; h < CollectionSizeINT; h++) {
	......
	}
In that loop, we will start by defining the “obj[]” which is one generated item in the collection. Then we will go through all the traits and select one random option for each dropdown menu on the Master Controller.
					function randomizeArtPiece(totalTraits,masterControllerObject)
{
	var objRand=[];
	for (var i = 0; i < totalTraits; i++)
	{

		var maxval= masterControllerObject.effect(i+1)("Menu").maxValue;
		objRand[i]= MakeRandomInteger(1,maxval);

	}

  return objRand;

}
In the above loop, we used “MakeRandomInteger(min, max)” function to get the random number. This is the code for that function:
Now we need to check if the created item was created earlier in our auto-generation process. This is a function we will use for that:
					function checkcontain(arr, obj) {

    var startcheck=0;
	for (var i = 0; i < arr.length; i++)
	{
	   startcheck=0;
		for (var j = 0; j < obj.length; j++)
		{
         if (arr[i][j]===obj[j])
		 {
			startcheck++;
		 }
		}
		if (startcheck===obj.length)
		{
			return true;
		}
	}
 return false;
}
If the item was not created before, we will add it to our generatedCollection[]. and render it using the MediaEncoderRenderFunc() we created earlier.
					     generatedCollection.push(obj);

		for (var i = 0; i < TotalNumberofTraits; i++)
	{
		masterControllerObject.effect(i+1)("Menu").setValue(obj[i]);
	}

	MediaEncoderRenderFunc(renderComp);
The functions we created before received our render composition or master controller composition as a parameter. As we only know the names of the after-effects compositions we are using, but not their index, we can run a function that will find their index number in the project:
					function GetInfo(testCompName)
{
	//function return composition after searching for a function with the same name
var myComp;
for (var i = 1; i <= app.project.numItems; i ++) {
    if ((app.project.item(i) instanceof CompItem) && (app.project.item(i).name === testCompName)) {
        if (myComp) {
            throw new Error();
        }
        myComp = app.project.item(i);

		return(myComp);
    }
}

}
And this is how the main area of our script will look like:
var mastercompName='Master Controller Composition'; //If your Master Controller AE Composition is named differently you can change it here
var renderCompName='CompToRender';
//If your Main AE Composition is named differently you can change it here


masterControllerComp=GetInfo(mastercompName);//get mastercontroller composition
renderComp=GetInfo(renderCompName); //get composition that will be rendered

GenerateCollectionBasedOnSize(renderComp,masterControllerComp);
You need to combine all the above functions and the main area into one .js file and run it in After Effects. Alternatively, you can just download the script above.
Now What?
After waiting some time for all the animations to render, you should now have a collection of animated NFTs you can upload to an nft marketplace.
Hey!
I'm a CG artist, designer and illustrator. I love to explore different creative forms, media types and artistic styles. Feel free to write me with your ideas, suggestions or requests.
Please note, that the links that have * next to them are affiliate links and those help support AnimationGuides.com website. If you decide to purchase something through those links, we will get a small commission that will help us to continue and provide new free content on this website.
For you, going through those links is the same as clicking on a direct link. You will never pay more for products as a result of clicking on our links. If anything, that can actually help you get a better price since we can sometimes negotiate better deals for our readers.
The content on our website is not affected by the affiliate products and always reflects our honest opinion. All the reviews you will find on AnimationGuides.com are unbiased reviews. If a product we recommend does not have a supporting affiliate program, we will still link to it, just with a standard link without the *.


")
