How to Properly Rig Long Hair Puppets in Adobe Character Animator?
How to structure a puppet art with long hair? Ho to make back hair follow head movements?[Download a Free Template for Long Hair Puppets + Free Example Puppet]
Rigging a long hair puppet in Adobe Character Animator * might seem like a standard rigging task at first. However, after starting the process you will quickly face rigging problems that are unique to long hair puppets.
Problems You Will Face:
1
What is the right way to structure a character art with long hair?
2
How to make the back hair follow head Movements and Tilts?
3
How to attach back hair to a turning head?
Although each of those questions may cause serious brain wrecking to one that deals with a long hair character for the first time. There are very simple and quick solutions to each of the above issues.
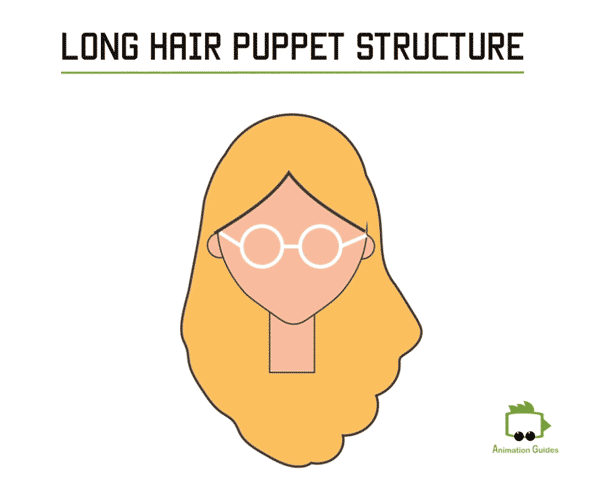
The first hair dilemma will occur already in your design software (Adobe Illustrator * in our case). Once you start separating your character art into properly structured layers there will be no defined place to put the back hair on.
For most characters, we can divide the hair into 2 main groups: front hair and back hair.
Placing the back hair in any part in the “head” group will result in the back hair hiding the neck. Well, unless you put the head below the body and drag the neck inside it. But that may cause many other rigging issues.
A solution that worked best for me was creating a new “Back-Hair” layer in each of the views. Then creating sublayers corresponding to each of the head views of our puppet.
This is how my structure for long hair puppets looks like:
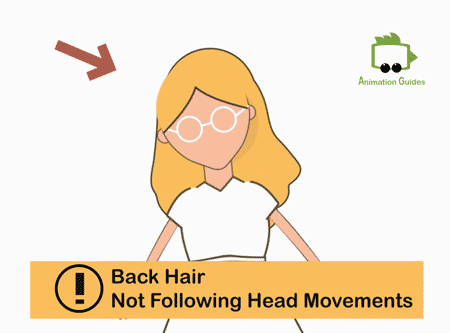
The first hair issue you might notice after importing the character into Adobe Character Animator is that it doesn’t move properly with the head movements.
The issue looks something like this: (*Might look more or less severe, depending on the hairstyle)
How to Fix?
There is a quick solution to this and it lies in the position of the origins for the head views. While the head origin should be placed at the neck area, the origin of each head view should be placed on the top of the head. (The area in which the back hair connects to the head)
So what you need to do, is just move up the origin of each head view (frontal, right quarter, left quarter, etc.).
3: How to Attach the Back Hair to a Turning Head
There are two main ways to approach head turns in Adobe Character Animator.
A. Head Turn Behavior
To make our puppet follow head turns recognized by the camera, “head turn” behavior should be added to the head.
But here is what happens when you do that:
How to Fix?
To fix this issue just add the “head turner” behavior to the “back hair” group as well.
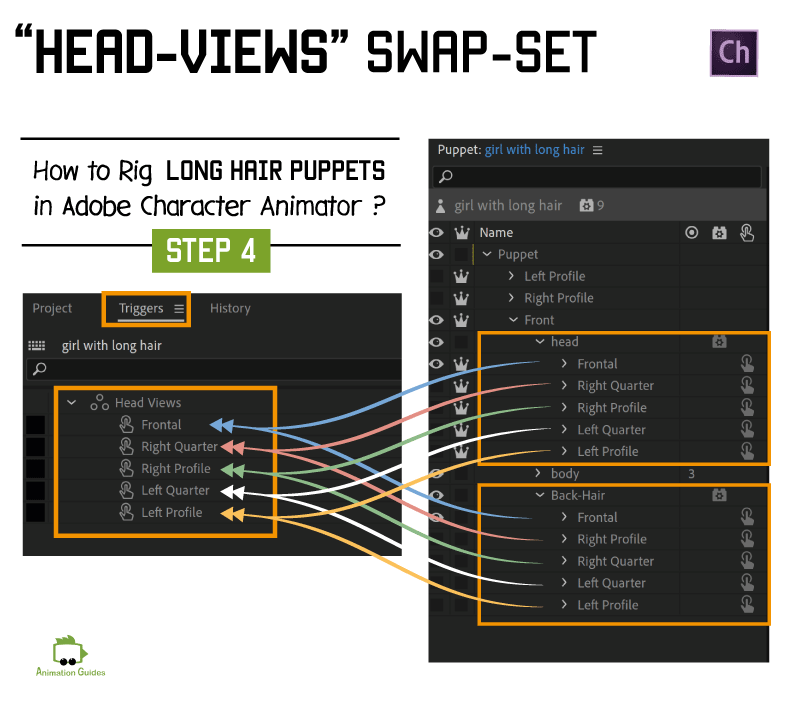
B. Triggers for Head Views
You can also make the character turn her head by triggering different head views.
Create a swap set with all the head turns triggers inside. Then trigger each view using keyboard shortcuts or the control panel.
If you do that only for the head views. You will end up with the same problem.
How to Fix?
For the head view triggers to work properly, the corresponding back hair view should be included in each trigger.
All of the fixes should be repeated for the left and right puppet profiles.
Once 3 of the above issues are resolved you should have a puppet with fully functioning long hair. For many artistic styles that can be enough and you can stop here. However, Character Animator has tools that allow you to go a step farther and make the hair movement more realistic.
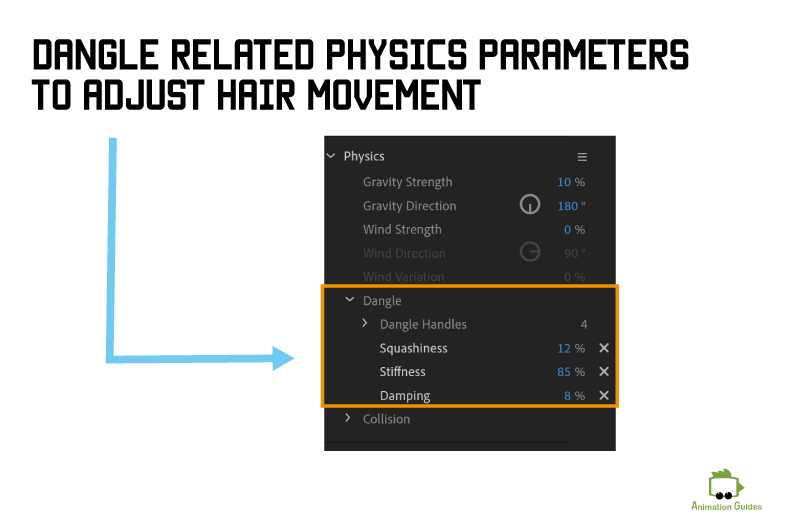
4: Adding Physics
Adding “Dangle Handles” to hair is a great way to give it more life. To add it, just click on the “Dangle tool” and draw dangle handles where you would want the hair to move. The origin of the hair part you add the dangle tool to is the pivot point.
The problem is that for the dangle tool to work properly it should be applied only to independent objects (The one with a crown next to them). But once we activate independence for our back hair parts, the back hair may again look detached from our head.
How to Fix?
The solution once again lies in the placements of the origins. The origin of each hair view (frontal, right quarter, right profile, etc…) should be moved to match the origin of a corresponding head view. The best practice would be to have the origins of all head views, all back-hair views, and also the origin of the “Back-Hair” group itself be at the same position.
To easily align all the origins you can select all the required views, which will make all the origins visible. Now move them all to the same point.
The movement of the dangle handles themselves can be adjusted by changing the dangle-related parameters (stiffness, damping, and squashiness) at the physics behavior.
Dangle should now function properly on the front view. However, if your puppet has the ability to walk, you might still see odd hair behavior when he/she is walking.
Fixes on Profile Views
1. You might need to add a neck tag to the head. My rig for long hair puppets heads on walk profiles looks like this:
2. The back hair for the walk profiles should be tagged the same:
Congratulations!
Your puppet should now have properly rigged and functioning long hair.
Hey!
I'm a CG artist, designer and illustrator. I love to explore different creative forms, media types and artistic styles. Feel free to write me with your ideas, suggestions or requests.
Please note, that the links that have * next to them are affiliate links and those help support AnimationGuides.com website. If you decide to purchase something through those links, we will get a small commission that will help us to continue and provide new free content on this website.
For you, going through those links is the same as clicking on a direct link. You will never pay more for products as a result of clicking on our links. If anything, that can actually help you get a better price since we can sometimes negotiate better deals for our readers.
The content on our website is not affected by the affiliate products and always reflects our honest opinion. All the reviews you will find on AnimationGuides.com are unbiased reviews. If a product we recommend does not have a supporting affiliate program, we will still link to it, just with a standard link without the *.