How to Add Moving Backgrounds in Adobe Character Animator
Follow these 7 simple steps and you will have a moving background and foreground for your character to walk through. [ + Download Free Interactive Environment ].
To achieve a believable character movement we should either make the character walk across the environment or make the environment move behind the character while he/she walks in place.
This tutorial is about how to create an environment that will scroll while your puppet walks in place. Apparently, there is a surprising, yet simple way to accomplish this in Adobe Character Animator *.
The Main Idea
We will bring the graphic files for the foreground and background separately into Adobe Character Animator. Then we will add a walking behavior to it and after some tweaking, we will be able to move everything together using the arrow keys in the Adobe Character Animator scene.
Follow these 7 simple steps and you will have a moving background and foreground for your character to walk in.
Step 1: Prepare the Artwork for
The first step would be preparing the artwork for the environment.
We will need to create the graphics for the Foreground and the Background and save them as separate files. The artworks can be saved as .ai, .psd or even just a simple .png.
Make sure you don’t use .jpg for the foreground layer since this format does not support transparency.
You can create your own artwork or just use the artwork in the example files to follow on. The artwork in example files is created in Adobe Illustrator * and includes source files for the Foreground, Background, and Middle-Ground. As well as the final .puppet files for each of the elements.
Download an Example Environment
Icludes:
.ai source file for the background, foreground and middle ground .
Final .puppet files for each of the elements.
An example project with a 'placeholder' character walking in place while the environment layers scroll through.
Since the background image will be the one moving instead of the character it should be significantly wider than the scene. It should be at least two times wider than the scene width. The wider the image the more walking space there is.
1.2: Create Foreground Elements
Adding a foreground layer to your scene will help create the illusion of depth. The foreground artwork you create should be the same width as the background layer.
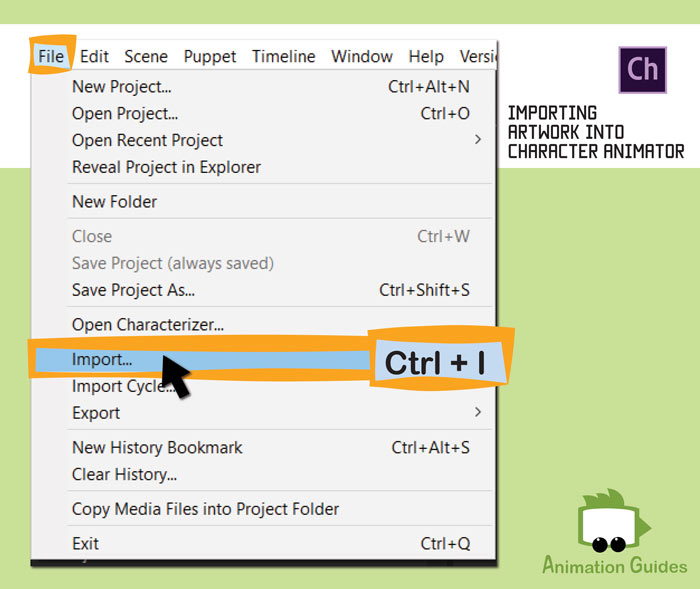
Step 2: Import the Artwork into Adobe Character Animator
Import both Foreground and Background source files to Adobe Character Animator.
Import a puppet with a walking behavior applied into the same project.
Select the Foreground (FG) and Background (BG) Elements in the project panel.
Click the + sign next to the Behaviors in the properties panel and add the Walk behavior.
Change the Mode to “Left and Right Arrow Keys“.
Set the Strength to 0% so the background and foreground will not move up and down during the “walk”.
Change the Body Speed to a Negative Value. (This value will require some tweaking to fit your scene size and puppet walk settings).
Body Speed for Both Foreground and Background should be Negative (-)
so it will move in the opposite direction to the character.
Set the Foreground to move faster than the background since objects that are closer to us appear to move faster.
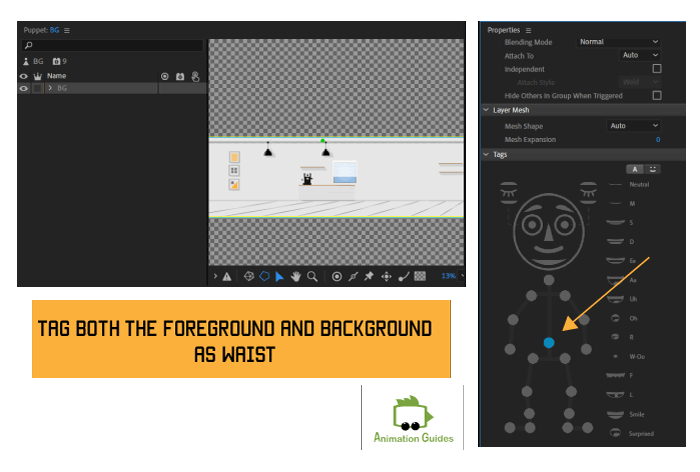
5. Tag the Background and the Foreground as Waist.
Step 5: Create a New Scene
Create a New Scene with the required dimensions.
Place your puppet in the scene.
Drag both the FG and BG into your scene.
Place the FG above the puppet and the BG below the puppet.
Step 6: Arm Everything and Press the Arrow Keys
Now you can test your walking scene.
Select and Arm your puppet, background, and foreground together.
Press the arrow keys to test the walk.
You might need to adjust the speed of your background and foreground to make the walk feel fluid.
Step 7: Add a Static Base Environment
An issue you might encounter when using a scrolling environment in Character Animator is that it will move as long as you press the arrow keys, even if it does not cover the entire scene.
A simple “lightweight” solution to it would be adding a static base background below the moving background so it won’t be so obvious if you accidentally walk farther than you intended.
Congratulations!
You now have a working parallax walking system. You can leave it as is or make it more interesting by adding some interactivity to the environment.
Step 8: Assign Animated Triggers to Objects in the Environment
Depending on your scene, there are ways to make it more interesting by adding triggerable animations and physics.
In the example scene, we have a door that can be opened and closed. Window bleeds that go up and down, an animated picture, and even some dangle handle on a few of the lamps just for fun.
Now What?
You now have a complete scene to move around in. Add a camera * to your scene and start recording.
Hey!
I'm a CG artist, designer and illustrator. I love to explore different creative forms, media types and artistic styles. Feel free to write me with your ideas, suggestions or requests.
Hi Raul, Thanks. Glad to hear you found it helpful! I was working with 3D software in the past: Maya, 3DS-Max, Lightwave, etc. Now mostly Adobe Character Animator:).
What the * means above
Please note, that the links that have * next to them are affiliate links and those help support AnimationGuides.com website. If you decide to purchase something through those links, we will get a small commission that will help us to continue and provide new free content on this website.
For you, going through those links is the same as clicking on a direct link. You will never pay more for products as a result of clicking on our links. If anything, that can actually help you get a better price since we can sometimes negotiate better deals for our readers.
The content on our website is not affected by the affiliate products and always reflects our honest opinion. All the reviews you will find on AnimationGuides.com are unbiased reviews. If a product we recommend does not have a supporting affiliate program, we will still link to it, just with a standard link without the *.


Great parallax tip!! Do you ever work with in Maya?
Hi Raul, Thanks. Glad to hear you found it helpful! I was working with 3D software in the past: Maya, 3DS-Max, Lightwave, etc. Now mostly Adobe Character Animator:).